 Using the Card Feature on the Cricut. I needed to make a few card to cheer a friend up so I thought I would do a tutorial for you.
***Even though I am showing you how to do this in Design Studio you do not need Design Studio to do this. ***
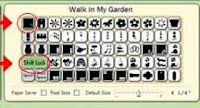 Now select the shift lock button and your card feature button again. You may need to cut a couple of different times for the shape to get all the colors cut. I cut four different times for this flower. Twice for green, one each of red and purple. I like to decorate my cards with an image on the inside.
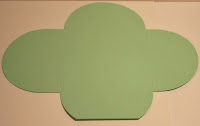
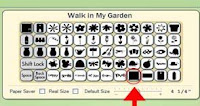 For the card base select the card base, load your paper and cut. The Cricut will score and cut. I have been using 8 1/2" by 11" card stock for card base and another sheet for the envelope.
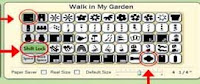 For the envelope select the card feature button, shift lock, and the envelope. This is the envelope that goes with this card. Load you paper and cut.
 I loose just a little bit of the flap when I use and 8 1/2 x 11" piece of paper. It's not a lot, I just make sure that this flap is folded to the inside. When folding you envelope be sure to use a bone folder. I use red line tape for the flaps on the envelope. Since I'm making this as a gift I leave the red plastic on the last envelope flap.
 Now that you have all of your elements cut you can assemble your card and envelope.
 I then tie a ribbon around the window and the side of the card top before I glue to the card base. I cut off the top of the green tulips before I glued the leaves on. I used pop up dots behind the purple and red tulips.

For the Dragonfly Card I used the Argyle folder, Sunflower Card - Bird Call Folder,Turtle Card -D'vine Swirl and the Bumble Bee Card - Mesh folder


First determine the size of the card you will be making and set the dial size to that. I am using 4 1/4 for my cards and envelopes. Now leave the dial size alone. You will not need to use it again for this project.

 Now select the shift lock button and your card feature button again. You may need to cut a couple of different times for the shape to get all the colors cut. I cut four different times for this flower. Twice for green, one each of red and purple. I like to decorate my cards with an image on the inside.
 For the card base select the card base, load your paper and cut. The Cricut will score and cut. I have been using 8 1/2" by 11" card stock for card base and another sheet for the envelope.
 For the envelope select the card feature button, shift lock, and the envelope. This is the envelope that goes with this card. Load you paper and cut.
 I loose just a little bit of the flap when I use and 8 1/2 x 11" piece of paper. It's not a lot, I just make sure that this flap is folded to the inside. When folding you envelope be sure to use a bone folder. I use red line tape for the flaps on the envelope. Since I'm making this as a gift I leave the red plastic on the last envelope flap.
 Now that you have all of your elements cut you can assemble your card and envelope.
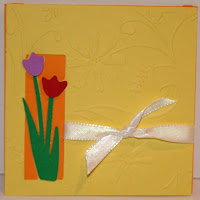
 I like to run my card top through the Cuttlebug to add some interest to the card. I used the Stylized Flowers for this card.
Depending on how you emboss your card front depends on where you window will be. For this reason I use double sided paper.
 I then tie a ribbon around the window and the side of the card top before I glue to the card base. I cut off the top of the green tulips before I glued the leaves on. I used pop up dots behind the purple and red tulips.
How you glue the card front to the card base will determine whether you have card that opens to the top or the side.

As I said I like the same design to the inside of my card. I glue the green tulip base to the side, then glued the purple and green tulips on top.
For the Dragonfly Card I used the Argyle folder, Sunflower Card - Bird Call Folder,Turtle Card -D'vine Swirl and the Bumble Bee Card - Mesh folder


Recipe: Cricut: Walk in My Garden Paper: 2 sheets of 8 1/2" x 11", scraps of green, red, purple Misc: glue, ribbon, cuttlebug, pop up dots, red line tape
No comments:
Post a Comment