Showing posts with label 8x8 Scrapbook Page. Show all posts

Wednesday, January 2, 2013

8x8 Album

Hi Everyone! Today I want to share with you a few 8x8 Layouts - this is kind of a long post as I have 8 layouts to share. The Scrappers Challenge Yahoo group has a template for an 8x8 album template using 12x12 paper and cutting it down. Well I'm cleaning out my left over paper file to make these layouts.  I keep my paper from other projects in one of the plastic scrapbooking plastic totes that hold 12x12 paper and it's running over. 
 
First up is a simple page using squares it page 3 in the template.  I already had the scalloped paper and just cut it down to fit the rest of my squares.
 
 
With my 8x8 pages I try to do a 2x8 and two 4x6's to finish off that page.  I had enough that I was able to piece the 2x8 page together. 

 
Here is the second set of pages using the scallop paper.

 
I added a tag to the 2x8 page and put the scallop paper in the middle. 

 
I ran out of scallop paper so I used regular card stock and the corner punch.  I added a tag to this page with a couple of pieces of ribbon.  I left the bottom of the tag free so that a picture can slide behind the tag.
 
 
I added the jewelry punch to this set of pages along with an epoxy sticker I had left over.
 

OK I have 3 pages using the same template along with 3 pages using the 2x8 and two 4x6 layout done.

As I was cleaning up I found another piece of the dream paper.  It was large enough that I could use template #6.  I used a punch on the edge of this white cardstock.


I punched several pieces of white card stock to make the borders on this set of pages.  I normally keep my white scarps of card stock for stamping sentiments.  I think I can sacrifice a few pieces for this layout. 


I kept the embellishment's to a minimum as this is another set of gift layouts that they will add their own journaling to. Out of 8 pages I only cut one sheet of 8 1/2" x 11" paper, everything else was in my left over paper file. 

Thanks for stopping by.

Recipe:
Paper: Pattern Paper: Piggy Tales - Row Row Row Your Boat "Dream" "Life" and "Your"; DCWV - Pink and white card stock
Ink: Inkadinkadoo - Olive Green
Punches: Stampin' Up - Jewelry Tag, Large Tag; Martha Stewart - Cherish punch around the page, photo corner punch
Ribbon: Unknown Scraps
Epoxy Shapes - Piggy Tales - Row Row Row Your Boat collection
Misc.: adhesive, zots

Monday, June 18, 2012

Family Layout

Here's another quick layout.  As I was cleaning off my desk I came across these Scrapbook Heaven decorative elements.  I was planning on using them on another project but didn't and hadn't put them away and thought they would make a couple of great 8x8 pages.  All of the elements are on pop up dots, so that photos can be slide behind.


I really like the way the 4x6 page turned out.  I have the cutting instructions below and did not make up a Design Studio file. 


Thanks for stopping by.

Cutting Instructions:
8x8 Page
Brown cardstock 8x8
Cream cardstock: 7 1/2 x 7 1/2

4x6 Page:
Brown cardstock 4x6 - cut 2, 2x8
Cream cardstock 3 3/4 x 5 3/4 cut 2, 1 3/4 x 7 1/2

Disclosure: I am not affiliated with any of the products mentioned.

Recipe:
Paper: Recollections cardstock - brown and cream
Ink: Inkadinkadoo - Navy Blue
Decorative Elements - Scrapbook Heaven Kit
Punch: Stampin' Up - Scallop Trim Punch
Misc: scraps of blue and off white ribbon, adhesive, pop up dots

Friday, June 15, 2012

It is a beautiful day

It's Unity Friends  with Flair day and I'm sharing a layout today.  I really like to use their stamps on layouts.  Today I've used the April 2012 Kit of the Month - Follow your own, sun journal spot and the "It is a beautiful day" sentiment.


I stamped the sun journal spot then cut it out.  I stamped the "It is a beautiful day" with olive green, punched it out and used pop up dots behind it.  I used the same punch for the blue accents and the border under the green mat. 


Since this is an 8x8 layout and I some scraps left over I made a corresponding page for the 4x6 photo mats.

Thanks for stopping by.

Disclosure: I am not affiliated with any of the products mentioned.


Cutting Instructions:
8x8 Page:
Background: 8x8 peach cardstock
Pattern Paper: 5 1/4 x 7 3/4
Green cardstock: 5 1/4 x 3 1/4
White Photo Mat: 3 1/4 x 4 1/4
Blue cardstock: Decorative Label punch - punch 5
Brown cardstock: 1/2 x 7 3/4 then punch.

4x6 Pages:
Background: Orange - Cut two 4x6 and one 2x6
Pattern Paper: cut one of each size: 1 1/8 x 5 7/8, 3 1/4 x 5 1/2, 1 1/2 x 2

Brown: 1/2 x 5 7/8, 1/2 x 5 1/2 and 1 x 8

Recipe:
Cardstock: brown, white, blue, green and peach; Pattern Paper - DCWV Nana's Nursery Baby Girl Collection
Stamps: Unity Kit of the Month - April 2012 {Follow your own}
Ink: Inkadinkadoo - navy blue, olive green
Punch: Stampin' Up - Decorative Label, Scallop Edge, scissors


Misc: adhesive, pop up dot

Monday, June 11, 2012

3 more layouts.

Here's a few more pages using up some leftover decorative elements from a Scrapbook Heaven Kit.
One the first page I used a buckle on the side with some ribbon and a couple of blue flowers.

I stamped along the side of the second page and used the tag on the bottom corner.


For the third page I used another buckle on the bottom of the page.  The top corner decorations is from the inside of the buckle with a small pink and white flower in the center.


Thanks for stopping by.

Cutting Instructions:
Background: 8x8
Cream Mat: 7 1/2 x 7 1/2

Disclosure: I am not affiliated with any of the products mentioned.

Recipe:
Cardstock: Pink and cream
Ribbon: Stampin' Up - Stitched Poly - Pear Pizzaa, Seam Binding - Baja Breeze
Stamp: Unity April 2012 Kit of the Month - {follow your own}
Ink: Inkadinkadoo - Olive Greene
Misc: scrap of ribbon for tag, adhesive, pop up dots, blue flowers, pink and white flower flat back pearls

Tuesday, June 5, 2012

Falling Flowers Layout

I had a few of the punched flowers that I've turned into a couple of 8x8 layouts. My photo mat is 4 1/4 x 6 1/4 .


I again used a bunch of scraps to stamp and punch my flowers.  The flowers are on pop up dots and each center has a few of the My & My Big Ideas beads in them.


Thanks for stopping by.
Recipe:
Paper: Scraps of cardstock in pink, yellow and orange, green,white, browns, purple
Stamp: Stampin' Up - Punch Potpourri
Ink: Stampin' Up - Rose Red, Razzleberry, Riding Hood Red, Melon Mambo, Cherry Cobbler, Tangerine Tango, Poppy Parade, Pumpkin Pie, Dusty Durango; Versa Magic - Coffee Bean, Midnight Blue
Punch: Martha Stewart - Branch punch,; Stampin' Up - , Boho Blossoms
Misc: Glossy Accents, Me & My Big Ideas - beads, Pop up dots, adhesive

Monday, June 4, 2012

Bee layout

I had a little bit of this bee paper left over and a couple of "Bee's" and thought it would make a great accent on a layout. 


 I used a pop up dot behind the Bee and mounted on top of the Decorative Label Punch out of Kraft card stock with part of a rhinestone swirl


As usual I made a 4x6 page to go along with the 8x8 page.

Cutting Instructions:
8x8 page:
Background: Tan cardstock 8x8
Brown: 8 x 5.5
Bee paper: 8 x 5.25

4x6 page:
Background: Tan cardstock - 4x6 - cut 2, 2x8
Bee Paper: 5.5 x 3.25 - cut 2, 1/2 x 8
Brown cardstock: 1x4 - cut 2 - then punch, 3/4x8


Thanks for stopping by.

Disclosure: I am not affiliated with any of the products mentioned.

Paper:
Dear Lizzy - Spring - Humble Honeybee paper; Kraft Cardstock, Scraps of brown and tan.
Punch: Decorative Label Punch, Scallop Trim Punch
Misc: adhesive, pop up dots, rhinestones

Monday, May 28, 2012

Easter

I had a few Easter tags left over from onther project and thought they would make great accents on an 8x8 layout.  This whole layout is made from scraps.


Cutting instructions:
Photo Mats: 4.25 x 6.25 and 3.25 x 5.25

Thanks for stopping by.

Disclosure: I am not affiliated with any of the products mentioned.

Recipe:
Cardstock: tan, brown and blue
Easter tags - Scrapbook Heaven Kit
Misc.: mini stapler, ribbon, adhesive and pop up dots

Monday, May 21, 2012

Three

The kids are turning 3 years old this year and here the layouts I did for them. I used The Graphically Speaking cartridge for the 3 word mesh and a Kit from Piggy Tales for the majority of the paper.  I did add a sheet or two of solid cardstock for the photo mats and background pieces.

First up is the 12x12 layouts


 The 12x12 layouts will hold 2 4x6 photos and I did a boy and girl layout just by changing the background papers but my "3" word mesh is still cut out of the same paper.


The 8.5 x 11 layout will hold one 4x6 and one 3x5 photo.


Then I did an 8x8 layout. 


Here is the 4x6's and the 2x8 piece for the next page.  I used a couple of punches to accent the 2x8 piece. 


Cutting Instructions:
12x12:
Background: 12x12
Solid cardstock - 10x10
Pattern Photo mats: 4.25 x 6.25 - cut two
Solid Photo Mats: 4.5 x 6.5 - cut two

8.5x11:
Background 8.5x11
Solid Cardstock: 7.5x8.5
Pattern Photo mats: 4.25 x 6.25 and 3.25 x 5.25
Solid Photo Mats: 4.5 x 6.5 and 3.5 x 5.5

8x8:
Background: 8x8
Solid Photo Mat: 4.5 x 6.5
Pattern Photo Mat: 4.25 x 6.25

4x6's
Backgrounds: 4x6 cut 2, 2x8
Photo Mats: 5.5 x 3.5 - cut 2


Click here for the 12x12 cutting file.
Click here for the 8.5x11 cutting file.
Click here for the 8x8 cutting file.

Thanks for stopping by.
Disclosure: I am not affiliated with any of the products mentioned.

Recipe:
Paper: Most of the paper is from the Piggy Tales Kit.  I did use a couple of sheets of cardstock for accents.
Piggy Tales Paper: Flower Paper - Simple Simon Collection - Plums; Polka Dots - billy goats gruff Collections - hillside; Plaid - Simple Simon - pieman, Photo mats on boy layout -Simple Simon - Thistle
Cricut Cartridges: George and Graphically Speaking
Punches: Stampin' Up - Designer Label Punch, Decorative Label Punch

Friday, March 9, 2012

Lady Bug

The February Unity Kit of the Month has the cutest Lady Bug Frame in it.  I created this layout just so I could use this stamp.


Thanks for stopping by.

Click here for the cut file

Recipe:
Paper: Cardstock - green, black and red; Pattern paper - DCWV - The Stack 6
Stamp: Unity February KOTM {lucky to have you} - ladybug frame
Ink: Stampin' Up - Riding hood red, black
Punch: Stampin' Up
Cricut Cartridge: Doodlecharms and Elegant Edges

Monday, February 13, 2012

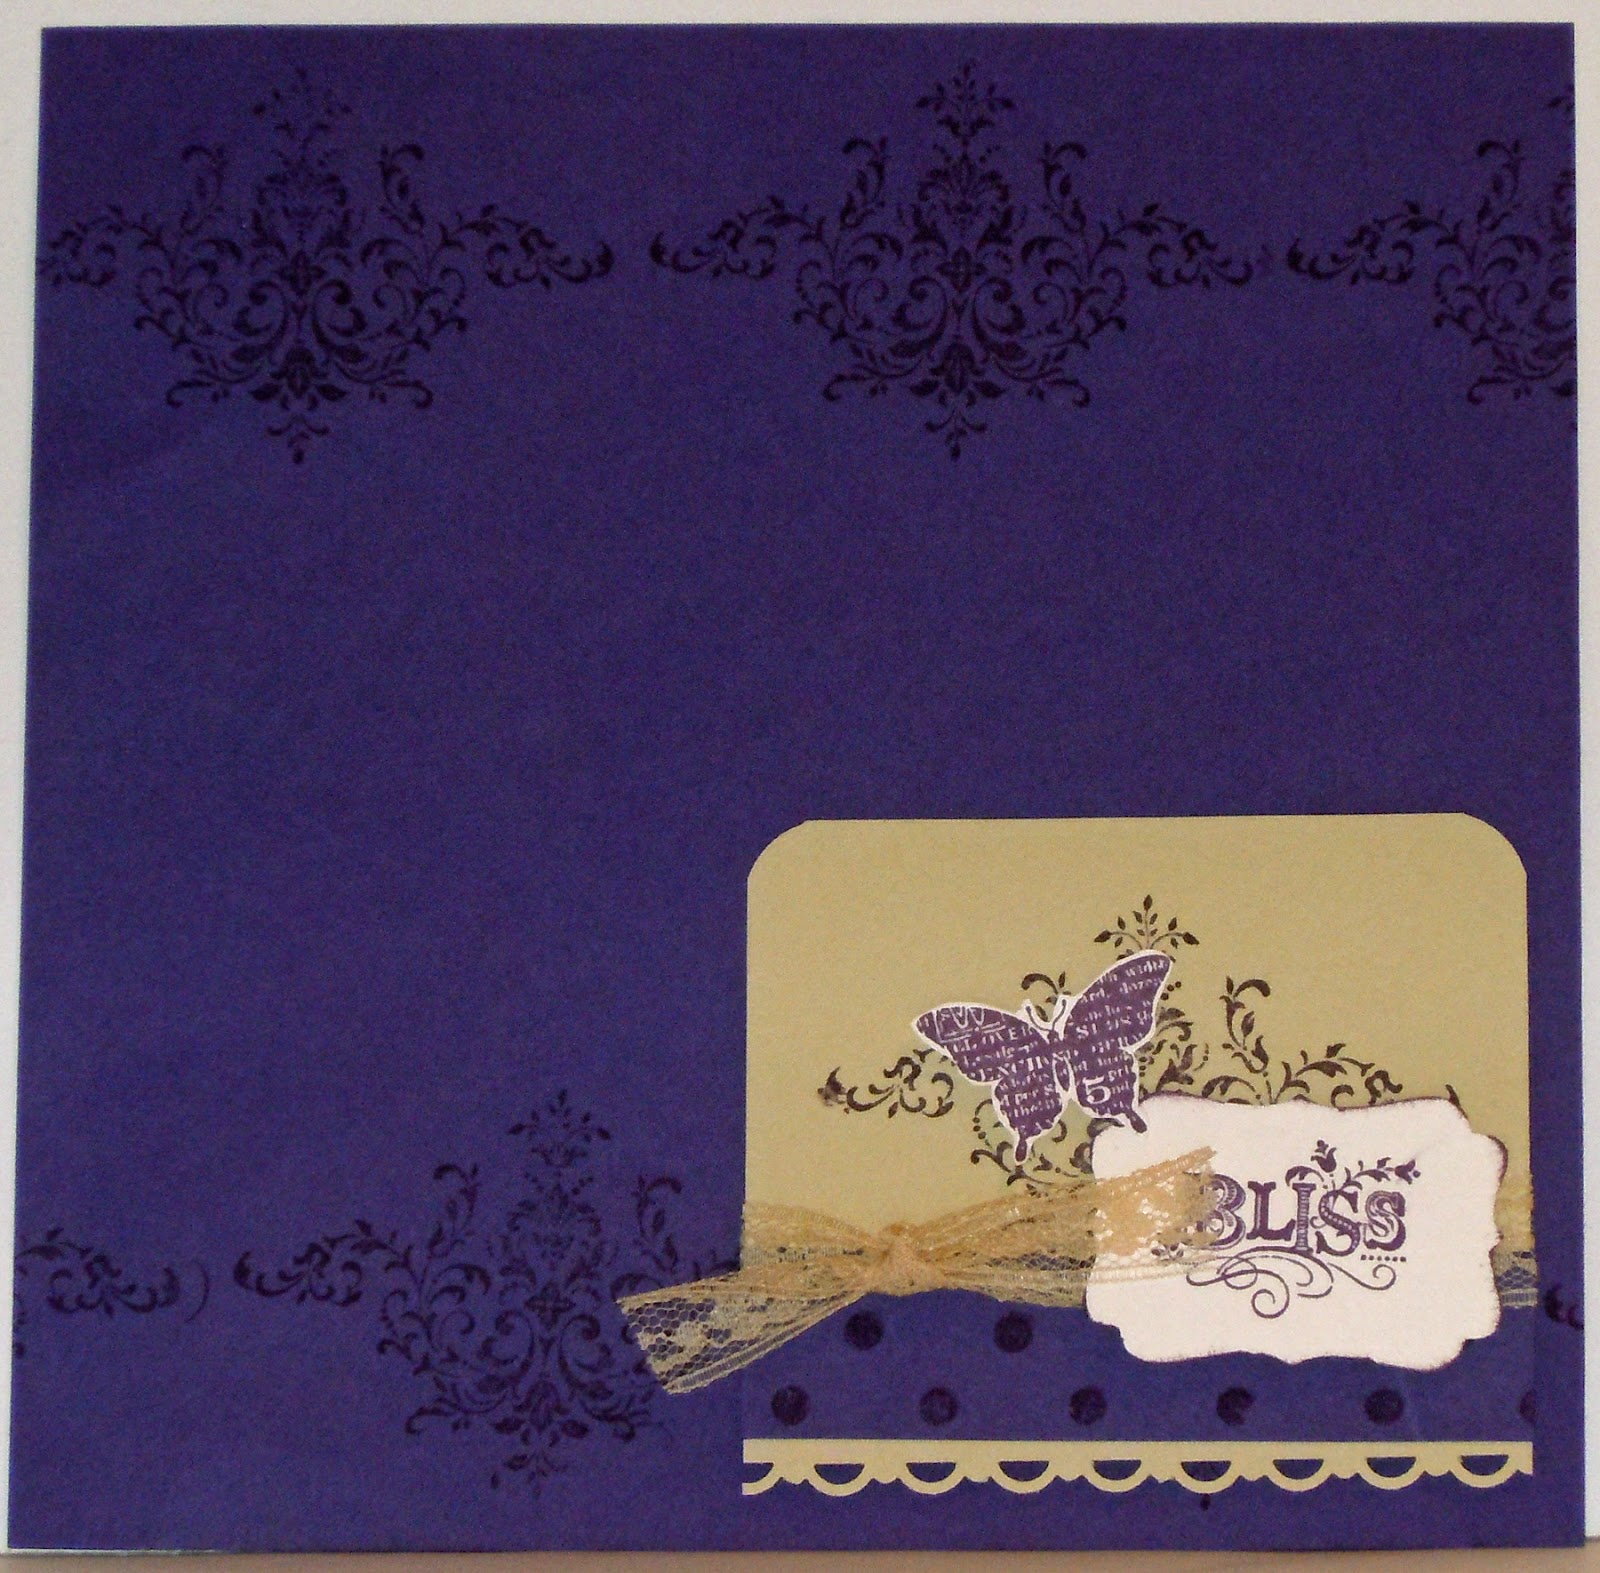
Bliss

I started with the Bliss stamp set and stamped my image across the top and bottom.  I do have the image offset on the bottom as I wanted more of it to show from behind my Bliss tag.  I used the same ink throught this project. 


I punched the bottom edge of the tan cardstock then stamped the image again in the center.  I made the Polka Dot strip from the same paper as I didn't have a purple pattern paper that would go .  "Bliss" is stamped and punched with the decorative label and there are pop up dots behind it and the butterfly.  I used foam tape on three two sides of the tan tag so that they could slide photo or journaling behind it.

With my 8x8 albums I like to include the two 4x6 inserts.  I kept them pretty simple by stamping my main image along the bottom then punching the tan cardstock again.  The 2x8 strip has a mini tag like the one on the main page. 

Thanks for stopping by.

Disclosure: I am not affiliated with any of the products mentioned.

Recipe:
Paper: Purple cardstock, Recollections - Tan and off white
Stamps: Stampin' Up - Bliss, Distressed Dots
Ink: Close to my Heart - Pansy Purple
Punch: Stampin' Up - Scallop Trim Border punch, Decorative label punch
Misc: pop up dots, adhesive, lace

Tuesday, January 3, 2012

Winter Woodland Skating Layout

The Bitten By the Bug 2 has a challenge going on that uses the Winter Woodland Cricut Cartridge.  Since I have that cartridge I thought I would do an 8x8 layout.  I have lots of fond memories of skating.  We didn't have rink, on the farm we used the overflow from the stock tanks or the stock tanks themselves. 


I stamped with clear embossing ink the polka dots and used clear embossing powder. I stamped the two smaller snowflakes from the Snow Swirled set on the pink cardstock then inked the edges of white cardstock.  The skates are cut out at 2" and layered.  I hand cut the bows off of them because I wanted to add my own.  I used some embroidery floss that is not separated for the laces and used glossy accents to glue them to the skate. 


I used the lined stamp from Notes and Details to make a journal spot and stamped with the small snowflake on the side.  Each page is similar in design I just changed the sizes a little bit. 

Thanks for stopping by. 

Challenges:
Bitten by the Bug 2 - Skate on Winter Woodland
Crimbo Crackers: Challenge 5 - Must use Snowflakes
Simon Says Stamp Challenge - Anything Goes

Click here for the Design Studio file.
Recipe:
Paper: Cardstock - green, white, pink, silver, red, black and white glitter paper - all are from my scrap box.
Stamps: Stampin' Up - Distressed Dots, Snow Swirled and Notes and Details
Ink: Stampin' Up  - Rose Red; Ranger -Clear Embossing Ink
Misc: rhinestones, adhesive, pop up dots, glossy accents, embroidery floss - I used Royal 109 - its really old, clear embossing powder and heat gun.

Monday, August 22, 2011

Playful Layout

Another set of layouts from the Thumbelina Collection from Piggy Tales. I added the red pom pom trim and the peach colored card stock from my stash.

Here is the 12x12 layout:
I inked all the edges before I stuck anything down. For the 2 1/2 x 2 1/2 border I cut 5 squares. I lined then up starting in the center and working my way towards the edge. I cut off the excess then inked the edge again.

Here is the 8 1/2 x 11 layout:

I did not like any of the remaining stickers so I made one using the Sizzix die set and the Toad paper. I then used three of the flower rub ons.

Here is the 8x8 and 4x6 layout.


I used a darker red pom pom trim on this layout.


I used a border punch and pop up dots on the red border

Disclosure: I am not affiliated with any of the products mentioned.

Here's the detail about each layout:

Playful 12x12:
Recipe: Piggy Tales April Kit of the Month - Thumbelina Collection
Paper: Background - Twelve Shillings - 12x12
Field Mouse (red and white side up) - 10 1/2 x 10 1/2
Marsh - 2 1/1 x 2 1/2 - 5 squares
Peach Card stock 10 1/2 x 5 1/2 (this was not included in the kit)
Piggy Tales Card stock Stickers and Playful rub on
Red pom pom trim (this was not included in the kit)

8 1/2 x 11:
Recipe: Piggy Takes April Kit of the Month - Thumbelina Collection
Paper: Background -Twelve Shillings - 8 1/2 x 11
Field Mouse (red and white side up) - 7 1/2 x 10
Marsh - 2 1/2 x 2 1/2 - 3 squares
Toad - die cut using the Sizziz 3 dies
Peach card stock (this was not included in the kit) 5 1/2 x 7 1/2
Piggy Tales rub on
Red pom pom trim (not included with the kit)

8x8 layout:
Recipe: Piggy Tales April Kit of the Month - Thumbelina Collection
Paper: Background - Twelve Shillings - 8x8
Field Mouse (red and white side up) - 7x7
>Marsh - 1 1/2 x 1 1/2 - 5 squares
Peach card stock (this was not included in the kit) - 7 x 4 1/2
Toad - die cut using the Sizzix 3 dies
Piggy Tales rub on
Red pom pom trim (not included in the kit)

4x6 layout:
Background - Twelve Shillings 4x6
Field Mouse - 1 1/x 6

Misc: adhesive, Stampin' Up - Scallop Trim Border punch, Sizzix - 3 dies medium, Peach colored card stock - unknown source, Red Pom Pom trim - Scrapbook Heaven

Monday, August 15, 2011

Film Strip Layouts

I made a set of Film Strip Layouts using The Stampin' Up Spiral Border Punch. I made my usual three sizes and will give a list of dimensions at the bottom of the post.

Each page consists of a large photo mat and a film strip with 2 to 3 white mats.


I inked all the edges even the black which is hard to see in the pictures.


I only made two photo mats on the 8.5 x 11 pages.


The ladies can use the photo mats on the film strip for pictures or to journal on


I made three little pictures on the film strip for the 8x8 page.


I kept both 4x6 mats the same and just turned one of them when placing in the sheet protectors. I used foam dots on the side of the film strip so that a picture can slide behind.


Now for the Dimensions of Each layout.

12x12 Layout:

Pink or Blue Background: 12x12

Newsprint: 11x11


Photo Mat layers:

Black: 5 3/4 x 7 3/4

Pink or Blue: 5 1/2 x 7 1/2

White: 5 1/4 x 7 1/4


Film Strip layers:

Black: 3 1/4 x 12 then punch the edges

White: 2 1/4 x 3 1/4 - you will need 3 of them


8 1/2 x 11 Layout:

Pink or Blue background: 8 1/2 x 11

Newsprint: 8x10 1/2


Photo Mat layers:

Black: 5 3/4 x 7 3/4

Pink or blue: 5 1/2 x 7 1/2

White: 5 1/4 x 7 1/4


Film Strip layers:

Black: 7 3/4 x 3 - then punch the edges

White: 2 1/4 x 3 1/4 - you will need 2 of them


8x8 Layout:

Pink Background: 8x8

Newsprint: 7x7


Photo Mat layers:

Black: 4 3/4 x 6 3/4

Pink: 4 1/2 x 6 1/2

White: 4 1/4 x 6 1/4


Film Strip layers:

Black: 2 1/4 x 7 3/4 - then punch the edges.

White: 2 3/4 x 1 1/2 - you will need 2 of them and 2 1/2 x 1 1/2 - you will need one this size.


4x6 Mat:

Pink: 4x6

White: 3 3/4 x 5 3/4

Black: 1/2 x 4 - then punch only one edge.


Recipe:

Paper: DCWV card stock - Blue, pink, white and black; Stampin' Up - Newsprint pattern paper

Ink: ColorBox - rosebud on the girl pages and turquoise on the boy pages

Punch: Stampin' Up - Spiral Border Punch

Saturday, August 13, 2011

You 8x8

On the 8x8 layout I separated the photo mats so that I could have larger pictures on each page.

I have "You" and the scallop photo mat as the first page.


The 4x6 pages are all the same with the band on the side.


I used the journaling spot and the larger photo mat on the last page.


Thanks for stopping by.


Click here for the cut file.


Recipe:

Paper: Sunburn - Green and orange; Stampin' Up - Black and white; The Stack DCWV - pattern paper; The Ultimate Premium Stack - Black and white pattern paper

Stamp: Stampin' Up - Notable Ornate - journal stamp

Ink: Pear Pizzaz

Cricut Cartridges: A Child's Year; George, Lacy Label

Misc: Adhesive

Wednesday, August 10, 2011

Grow, Cherish and You are my sunshine layouts

I'm back with three quick layouts and all are done without the Cricut.


I used the papers from the April Piggy Tales Kit - Thumbelina Collection. I just love this paper and it's perfect for some Girl Layouts. The kit included 3 sheets of each paper so I was able to make an 8x8 with two 4x6 layouts, an 8 1/2 x 11 and a 12x12 layout. The difference between the layouts is that each one has a different rub.

Grow Layout 8x8:


The big butterfly was a pattern that was included in the kit. I used a punch for the smaller butterflies and the photo mat is 4 1/4 x 6 1/4 inches.

I made two of the 4x6 pages exactly the same.


Cherish Layout 8 1/2 x 11


I used two large butterflies on this lay. The photo mat is cut at 4 1/4 x 6 1/4.

You Are My Sunshine Layout 12x12"


I used two photo mats on mats on this layout cut out at 4 1/2 x 6 1/2 each and two large butterflies.

Thanks for stopping by.


Here's the details about each layout
Grow Layout 8x8 and 2 4x6 pages:


Recipe: Piggy Tales April Kit of the Month - Thumbelina Collection

Paper: Background - White Butterfly; Photo Mat - Mole; Stripe - Mole; Red trim - Bird: Large red butterfly - Little Fishes: Punched butterflies - Pink - White Butterfly; Orange - Marsh; Stripe - Mole:


Cherish Layout 8 1/2 x 11:


Recipe: Piggy Tales April Kit of the Month - Thumbelina Collection

Paper: Background - White Butterfly, Green pattern paper - Tiny; Photo mat - Mole: Stripe - Mole: Blue and Red Large Butterfly - Little Fishes; Red strip - Bird; Punched butterflies - Pink- White Butterfly; Light Blue - Marsh; Orange - Tiny


You Are My Sunshine Layout 12x12:


Recipe: Piggy Tales April Kit of the Month - Tuimbelina Collection

Paper: Background paper - White Butterfly; Photo Mats - Mole; Green Stripe - Tiny; Red and Blue Large Butterfly - Little Fishes; Punched butterflies - Orange - Tiny; Stripe - Mole; Light Blue - Marsh; Pink - White Butterfly


Used on all three layouts:

Rub on Phrases: Thumbelina Collection

Misc: adhesive

Punches: Martha Stewart - butterfly; Stampin' Up - Scallop Trim Border punch, corner rounder punch

Monday, June 27, 2011

Notably Ornate - 8x8 Layout

I just love the journal stamp in the Notably Ornate stamp set and how easy it stamps. I stamped the journal stamp in Pear Pizzaz and fussy cut it out.


I used the D'vine Swirl Embossing folder to emboss the pink photo mat, (it's hard to see the embossing in the picture). I tucked the stamped journal spot and the tab behind the photo mat.

On page four I embossed the strip instead of the photo mat, (I put my 4x6 page in between my 8x8 pages).


On this set I kept the 4x6 photo mats the same and just alternated them in the album. I punched the border of the white mats and layered it onto pink card stock. They can use this to journal or as a photo mat.


I used a double scallop trim on the second set of 4x6 photo mats, which is on pop up dots so they can slide a photo behind.


Thanks for stopping by.


Recipe:
Paper: Pattern Paper - Nana's Nursery; DCWV card stock - white, pink green
Stamp: Stampin' Up - Notably Ornate
Ink: Peat Pizzaz
Punch: Stampin' Up - Scallop Border,2"x 1 3/8" Oval, Corner Rounder; Martha Stewart - Swirling Lace Corner Punch
Embossing Folder: Cuttlebug - D'vine Swirl
Misc: adhesive, scissors, pop up dots