Showing posts with label Tag. Show all posts

Friday, January 21, 2022

Surprise Challenge at Counterfeit Kit Challenge Blog

 I have a surprise challenge on the Counterfeit Kit Challenge Blog today. Since it is my birth month I'm throwing out a challenge to make a card and tag, for any occasion. I don't know about you, but I never have enough ready ahead of time. I am always making them when I need them. 
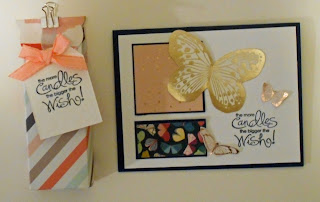


In my CKC January 20222 - The Journey kit I added in a couple of 6x6 paper pads.  I found a 6x6 One Sheet Wonder from  Patricia Dominicci at Jumping into Stamping.com (tutorial here https://jumpingintostamping.com/2021/02/11/6-x-6-one-sheet-wonder-with-berry-blessings/amp/). It used a combination of paper and stamping, the stamping can easily be replaced with die cuts which is what I did along with the fussy cut butterflies.


As I went down the rabbit hole of 6x6 paper pads I found a tutorial for a mini bag from Chic N Scratch that used a 6x6 piece of paper (her blog post is here: Tag Topper Treat Box - Chic n Scratch). I found a similar paper in one of the 6x6 paper pad and made this cut little bag. It's big enough to hold nail polish and lip balm along with a couple of mini-Reese's 


Here is three more of the cards I made. I will be making little tags and bags to go along with them, that way I will be ready.  


Thank you for stopping by.

Friday, February 10, 2017

Valentine Treat Container and Tag

I always make a few treats for the guys for Valentine's Day. I saved a few nut containers to use for chocolate covered pretzels. I covered the container with a strip of heart paper and made a tag.

I used the Misti to do my stamping, I just kept moving my tags around. One of the flowers I stamped on pink, cut it out and added it on top of everything. None of the tags are the same size - I just used scraps of white cardstock.


I use a Zot to attach the tag to the container.


Recipe:
Paper: Amy Tangerine Stitched.
Ink: Ranger Archival Ink - Black
Stamp: Stampin Up -Fabulous Florets; Unity Stamps Kit of the Month January 2015 {Magic of Beginnings} - lace stamp; December 2016 {always been you} - xoxo stamp
Misc.:  Adhesive, Miscellaneous lace and twine and Zots

Thanks for stopping by.

February Counterfeit Kit - Going Big
2 - 12x12 Layouts
 - 8 1/2x11 Layouts
- cards
3 - Treat Containers with tags

Saturday, January 23, 2016

Counterfeit Kit Challenge Blog Hop

Today is the Counterfeit Kit Challenge Blog January blog hop.  You should have arrived from Jemma’s Blog, if you are just now joining the hop you may want to go to Counterfeit Kit Challenge Blog to start at the beginning of the hop (complete listing is below).

This month we could choose to share any project we have made with our Counterfeit Kit challenge kit which was not yet shared on our blog. Your project could be related to any of the three challenges or something new. The challenges this month are:

Challenge #1: What makes you Smile!
Challenge #2: Matching card and tag
Challenge #3: Get your stamp on! . . Get your Stamp on!

I have Challenge #2 and #3 to show you today. Fist up is the second challenge from the Counterfeit Kit Challenge Blog is a matching Card and Tag and I have a couple of Birthdays coming up so this is the perfect challenge for me.

 
I started by stamping the balloons several time with different colors of ink and cutting them out. I then layered them on the tag and the embossed background. the bag is also stamped and cut out but has foam tape behind it. 

Each balloon has a matching embroidery yarn or floss string going into the bag.


My second project is for challenge #3 - Get your Stamp on! I made a 8 1/2x11 and a 12x12 layout for this challenge. I definitely need to stamp more on my layouts.  I used a stamp of an ice cream truck to make a couple of layouts. I stamped it on a diagonal with black ink then stamped an extra one on a piece of scrap cardstock, cut it out and colored it in with sharpies.


I again used foam tape behind the ice cream truck to make it stand off the page. 


I layered a piece of black cardstock on the diagonal and created white film strip mats for the pictures..

Your next stop on the hop is Julene who always has something wonderful to share.
If you want to start at the beginning of the hop or get lost along the way:


 Thanks for stopping by.

January 2016 Counterfeit Kit - Fresh Start
9 - 12x12 Layouts
3 - 8 1/2x11 Layouts
1- Card and Tag

 Recipe:
January Counterfeit Kit - Fresh Start: DCWV - Heirloom Stack; Recollections cardstock; Kraft, tan, black and white; unknown off white
Ink: Color Box - Marigold, Scarlet, Lime and Chestnut; Stazon - Timber Brown; Ranger - Jet Black
Stamps: Unity KOTM March 2011 {from head to soul} the balloons and July 2012 {Ol' Bag of Fun} bag; Unity KOTM June 2012 {sweet summer love} the ice cream truck
Embossing Folder: Cuttlebug - Birthday
Misc.: Adhesive, embroidery floss and yarn, foam tape, pop up dots, scissors and sharpies

Saturday, July 19, 2014

Late Tag

Well I missed the Friday Friends with Flair challenge but I'm still in time for the Craft Hoarders Anonymous Challenge Blog challenge which is to make a tag.  So I pulled out some scraps from my July Counterfeit Kit to make the tag. 

I started by stamping onto watercolor paper and using  clear embossing powder.  I then colored my image and cut her out.  The stamped image actually has some distress on the left hand side that I cut away.


I distressed the background paper, added some lace and velvet trim then a couple of silk flowers.  The Misted doily was left over from another project.


I kept the back pretty simple as I don't have a specific use for her yet. I just added a paper border and a little blink in the corner.

Counterfeit Kit Challenge - July
8 - 12x12 Layouts
2 - Mini albums
1 - Tag

Recipe:
Paper: Counterfeit Kit: Dear Lizzy - Spring "Giddy Grasshopper" and "Dragonfly Dance"; Added to Kit: Doily, tag, and Water Color Paper
Stamps: Unity Kit of the Month - June 2014 {In Love with Love}
Ink: Tim Holtz Distress Ink - Vintage Photo
Misc.: Adhesive, Clear Embossing powder, Distress Took,  Foam Tape, Jolee's Bling, Ribbon scraps, Scissors, Silk Flowers and Zots

Friday, October 25, 2013

Keep Calm . . .

and Have a Beer:

I was one of the lucky winners a couple of weeks ago for the GIU and because of that I was able to pick out two Itty Bitty Stamp sets. I can tell you it's a hard choice.
 
My guys are big fans of "The Chive" so I had to pick this stamp.  I did a bunch of techniques on this tag, then started making my layers. 

 
I stamped the beer mug and backed it with a scrap piece of cardstock.  The quote is stamped onto vellum, cut out and glued to the beer mug.  
 

I added some stenciling and clear embossing, then the tissue tape and finally some Tim Holtz metal.  I added the pearls to the top of the card.

Thanks for stopping by.

Entered in:  Friends with Flair

Recipe:
Paper: Shipping tag, Stampin' Up - Vellum
Stamp: Unity Itty Bitty - Keep Calm and have a beer
Ink: Distress ink: Wild Honey, Vintage Photo, Black Soot, Broken China, Festive, Berries, Peeled Paint, Rusty Hinge, and Pumice Stone
Paint Dabbers: Pebble and Sandal
Tissue Tape: Tim Holtz - Symphony
Metal: Tim Holtz - File Tabs and corners

Friday, March 1, 2013

Dress form Tags

Happy Friday! Today is Friends with Flair at the Unity Blog and The Shopping Our Stash  challenge #91 is to use a Tag on your project or create a Tag. . 

Tag #1:  I used the dress form stamp from the Unity KOTM November 2011 stamping on tan card stock twice.  I cut both of them out.  The second stamp I used as a template to cut out of the pattern paper.  I stamped the measuring tape onto a piece of ribbon and scrunched it onto the side of the tag.  I finished it off with a few rhinestones and a piece of  scrap ribbon.


For my second tag I used Stampin' Up's  Sew Suite dress form and stamped it directly onto the scalloped oval.  Then I stamped onto the back of my pattern paper and cut it out.


For the Shopping our Stash challenge I made the tags from off white card stock then covered them with scraps from my scrap pile.  The ribbons and rhinestones are left over from other projects.

Thanks for stopping by.

Challenges Entered:
Friends with Flair
Shopping Our Stash

2 Stamps sets used for the Use Every Stamp 2013

Recipe:
Cardstock: Recollections - off white for tag base and scallop. Unknown pattern paper - from my scrap pile
Stamp: Stampin Up - Sew Suite; Unity Kit of the Month November 2011 {take your time}
Ink: Stazon - Jet Black; Inkadinkado - burgundy
Punch: Marvy scallop ova; (the pink one)
Misc.: adhesive, pop up dots, rhinestones, ribbon, crop a dile.

Friday, October 26, 2012

Happy Fall - Freinds with Flair

Happy Friday!! It's been a long week in my neighborhood and I'm really glad it's Friday even though I have to work - it's just that the weekend is that much closer.  I have a Happy Fall tag to share with the Friends with Flair Challenge.


I used up a bunch of scraps to make this tag.  I even added a piece I had saved from a wine bottle decoration which is the twine and branch. 

Thanks for stopping by.

I am entering this in the Unity Friends with Flair.

Disclosure: I am not affiliated with any of the products mentioned.

Recipe:
Paper: All of the paper are scraps from other projects.
Punch: EK Success  Paper Shapers  Flour Burst-  Stampin' Up - Lace Ribbon Border
Stamps: August 2012 Kit of the Month - color of the Season
Ink: Autumn Leaves - brown; VersaMagic - Coffee Bean;
Misc.: Adhesive, pop up dots, hot glue, twine and branch is from a wine bottle,  twin, button, ans scissors

Friday, August 17, 2012

Bird Tag

I was cleaning off my desk and came across this stamped bird image and a couple of mini flowers and was inspired to make a tag. Everything on this tag is left over from other projects that I incorporated onto this tag.  The swirl is a chipboard piece that is painted and distressed. The mini flowers are glued to the inside circle of the swirl and a pearl is added to each flower.  


Thanks for stopping by.

I'm entering this in Friends with Flair Challenge.

Recipe:
Unknown paper scraps from other projects, white seam binding, mini flowers, chipboard swirl, pearls, Stamp - Unity Kit of the Month - May 2011 {...think HAPPY thoughts}

Tuesday, August 16, 2011

M.A.G. Challenge by the Page #39

The M.A.G. Challenge this week is to use Tags, Bags, Boxes and More page 89 in the handbook.

I used the Mirror/Window tag as my base.

I used the Blackout feature to cut the inside of my tag.


Recipe:

Paper: Sunburn Collection - tag base; Unknown card stock; Brown and white; Designer Paper - AC Patterned Paper - Metropolitan

Stamp: Stampin' Up - Just Believe

Ink: Stampin' Up - Pear Pizzaz, Poppy Parade, and Early Espresso; Distress Ink - Vintage Photo

Punches: Stampin' Up - Eyelet Border punch, Extra Large Decorative punch

Ribbon: - Stampin' Up

Misc: adhesive, pearls


Thursday, November 11, 2010

Thanksgiving Card Swap

This months Stamp Club Theme is Holiday. I decided to do a Thanksgiving card and I can send it to my sister.

I just love the way it turned out. It was a little labor intensive doing this for everyone in the group, the coloring of the tag, creating the quote to the right size, and stamping on the inside to cover up the vellum on the back of the card front. But I think it is worth it.

The brown cardstock is embossed but you could use regular brown cardstock. I just love the pattern paper and wish I had more of it. There is a slight shabbiness to it. I created the quote in Photoshop, printed it onto vellum, centered it onto the card front and wrapped it around to the back of the card front.

I used red line tape to attach the vellum to the card front at the bottom of the pattern paper only.

The sunflower border is stamped and clear embossed onto orange cardstock. I tried to match it to the orange in the pattern paper. I made the tag the hard way - using my paper trimmer to cut to size, scissors to trim the corners and crop-a-dile to punch the hole.

I stamped and clear embossed the saying onto white cardstock and cut it to cover the vellum on that is wrapped around from the card front.

Thanks for stopping by.

Recipe: Cardstock - white, orange and Brown cardstock - AC Cardstock "Chestnut Damask", Pattern paper - Lily Bee Design " Lovely", Vellum
Stamps: Stampin' Up - Bright Blessing Roller Stamp, Clear Designs - O - Leaf on envelope; Sunflower Border stamp - unknown by whom
Ink: Stampin' Up - Early Espresso, Poppy Parade; Inkadinkadoo - Burgandy
Markers: Stampin' Write - Soft Suede, Poppy Parade, Crushed Curry; Zig Burshables - Spring Green
Misc: Crop-a-dile, clear embossing powder, ribbon.

Tuesday, September 7, 2010

5 Tags in 5 Days - Day 2

Even though I cut the "Love" with my cricut I fussy cut to get the three separate layers. The swirl is Glimmer misted after I cut around it. The "LO" is then cut away from the swirls and "VE" and the same thing is done for the "VE"
Here's the back of the tag.
The double mini tag is welded together in Design Studio. I used a rub on for the saying on the mini tag, then lined the other side for journaling.


I really like thses stamps from Unity and had to add them to the backs of the mini tag.


Recipe: Paper: Kraft and white cardstock, Citrus Stack
Stamps: Unity -Butterfly Beauty
Ink: Stampin' Up - Dusty Durango Distress Ink - Tea Dye
Cricut Cartridges: George, Heritage, Home Accents, Tags Bags Boxes and More
Punches: Martha Stewart - Butterfly punch, Floral Lace Edge punch
Misc: Rhinestones Petal, Sva Creative pearls, Petals, white flower pin, pink micro beads, lace, Friendship Quote rub ons, glue Peach Delight Glimmer Mist

Monday, September 6, 2010

5 Tags in 5 Days - Tag 1

I came across this blog and she was talking about 5 Tags in 5 Day on this blog. There is step by step directions on how to make these. I'm going to use what I have to make the tags and cut my cricut to cut out the embellishment's.


The dark green pearl is one I colored, you can find my tutorial here.


My tags are a bigger than the tags you pick up at the office supply store, but all the cuts can be cut using the 6x12 mat.


Here is the back of the mini tag.


Paper: Kraft Paper, orange card stock, Garden Party Stack, page from a book.
Stamps: Michaels - believe, Unity Stamps - Butterfly Beauty
Ink: Stampin' Up: Black, Melon Mambo Distress Ink: Tea Dye
Cricut Cartridges: George, Home Ascents, Indie Art, Tags Bags Boxes and More
Punches: Martha Stewart - Butterfly
Misc: Clear Embossing powder, white felt, pin, beads, brown marker, button, rhinestones

Thursday, March 25, 2010

Grateful Tag

Can you believe this started out as white card stock. I first stamped my background and embossed using perfect pearls. Then I dug out my reinkers and went to work on the background. The fiber was left over from a scraf I had made my for my sister.


The flowers are cut with my Cricut on white card stock, glued together, glimmer misted and turned the edges under. I added a little rose in the center of each flower after I distressed inked and glimmer misted.

The butterfly was stamped on a piece of acetate then embossed and cut out.


Grateful was stamped white card stock, distressed with ink then covered in Glossy Accents. The brads were attached afer it dried.

Tuesday, June 17, 2008

Birdie Tag . . .


Inspiration for this comes from My Crafting Moments and Other Stories.


Recipe: Stamps: Close to my Heart: Doodle Alphabet, Elegant flourishes, Ink: Terra Cotta Misc: Ribbon, gold pen

Wednesday, June 11, 2008

For You . . .


I cased this one from Kiyomi Krafts. Since I didn't have any of the products she used, I substituted stamps from From Me to You and the Cricut A Walk In My Garden cartridge.

The circles are cut from George 1" for the white and 1 1/4" for the tan. The ovals are cut 1 1/2" from tan and shadow blackout for the brown.


Recipe: Paper: Scraps of brown, tan, white, dark red, pink Stamps: From Me to You - For You, Leaf and stem, solid leaf, Fou You, Motif Ivy Leaf - Michaels Ink: brown and green Paint: Old Parchment Ribbon: Offray Sheer in green Misc: Pop up dots, glue, Fray Check

For the Guys . .

Since I have so many men in my life I always need some guy stuff. These are two of my favorite guy stamp sets from Close to my Heart.


When I pull out a set of stamps I normally stamp them a bunch of times, especially when I use stazon ink like I did here. They were actually stamped a couple of month ago.

I haven't decided what saying to put on this one, so will wait until I send it out.


The quail was stamped twice, once by accident. I didn't like how the first one turned out so I stamped again then decided to use the first one as a shadow. I like it when accidents turn out great.


Recipe: Paper: scraps Stamps: Close to my Heart-Hunting, Fly Away Ink: Stazon Brown Cricut: George Misc: brads, glue and pop up dots, corner rounder punch

Monday, June 9, 2008

October . . .


The pumpkins, cat and candy corn are left overs from another project, and the paper is all from the scrap file. The pumpkins are made with four ovals outlined with markers and glued together. The stems are free handed and outlined in green. I used the Fiskars oval template to cut these out. The cat was stamped in black ink, embossed in clear, and the eyes were painted in. The candy corn was stamped and colored in and then embossed in clear. I havea pop up dot behind the top candy corn. I used All Mixed Up to cut the Oct out.

Recipe: Paper: Cricut paper - Doodlecharms and Celebration, purple textured card stock, black, orange, green and tan Cricut: All Mixed Up, Ink: black, Versa Mark Stamps: Cat is from Halloween foam stamps - Making Memories, Cand Corn - October Clear Design Markers: orange, yellow, green Misc: clear embossing powder, pop up dots, Fiskars oval template

Sunday, June 8, 2008

Love - February

Caardvarks had a challenge in May to make a tag inspired by the month. I didn't participate in the challenge but I like the idea. I am going to make a tag for each month, and I will be using left overs and here is the first one.


The green base is 2 3/4" x 5". I have scalloped two pieces of the fresh Paint Metallic paper (the piece I choose was not large enough to cover the inside of the tag) using the corner punch. On top of that is a green piece from Cardmaker's Earthtones. I have no idea where the small green square if from.

The Heart was left over from another project and I used the Fabulous Finds to cut it out. It is actually from cardboard and sponges with two different colors of pink ink.

"Love" is cut from All Mixed up in white and a dark green. I sponged the white with the same two pink inks as the heart. I used the Shadow feature on the Cricut for the dark green paper. The flowers under the heart are from A Walk Through My Garden.

Recipe: Paper: Textured green cardstock, fresh Paint Metallic, Cardmaker's Earth Tones, Cricut: All Mixed Up, Fabulous Finds, A Walk Through My Garden Ink: Orchid and a dark pink.
Misc: corner punch, flowers, brads, glue and pop up dots