Showing posts with label George. Show all posts

Thursday, June 25, 2015

Window Seat - Challenge #2 Transportation

I finished the guys' layout looking out the helicopter windows for Challenge #2 - Transportation Challenge on the Counterfeit Kit Challenge blog.  The last day at the Bar 10 we took a helicopter ride to the Colorado River - it was awesome!


I got the right date on their layouts and will have to go back and fix mine. I used Design Studio to get the window placements where then cut them out.


For the 8 1/2 x 11 layout I shrunk the windows down and only used 2.  I couldn't find a Cricut cut that I liked and I do not have a helicopter stamp so I used the little passport stamp that has an airplane on it.

Thanks for stopping by.

June 2015 Counterfeit Kit - Way Out West
14 - 12x12 Layouts
11 - 8 1/2 x 11 Layouts

Recipe:
Paper: June Counterfeit Kit:
Alphabet Sticker: Pink Paislee - Whimsies Chocolate; Doodle Bug - Teensy Type - white; Heidi Swapp - rub-on numbers
Cricut Cartridge: George and the Basic Shapes
Punches: Martha Stewart - Loop Border; Stampin' Up - Scallop Border
Ink: Distress ink - Black Soot
Stamps: Lil Davis Designs - Away We go Now boarding
Misc.: Adhesive, Brown Sharpie, Cricut Design Studio, DIY Enamel Dots, Embossing Powder- Clear,  Heat Gun and Labels

Wednesday, January 21, 2015

Wings

Well I finished my first layout that I was working on using the Cricut Cartridges that I included in my Counterfeit Kit.  I just had to walk away from it and come back to it and it came together.


The black paper was tearing while I was distressing it so I added a rhinestone, the banner and butterfly to a couple of the spots. I use black soot ink and clear embossing powder to make the larger butterfly stand out, then added the pink butterfly and rhinestone to it.


Thanks for stopping by.

January Counterfeit Kit - Renew
9  - 12x12 Layout
2 - 8 1/2 x 11 Layout

Recipe:
Counterfeit Kit - January Renew:
Paper: Prims - Shabby Chic Collection "Sweets", Angelique Collection "Wings"; DCWV - Ultimate Premium Stack - Fall, Black and White; Recollections - black; Transparency and Unknown tan cardstock
Ink: Distress Ink - Black Soot
Punch: Martha Stewart - Photo Corner Punch
Rub Ons: 7 gypsies - Calais Elements
Cricut Cartridges: George and the Basic Shapes and Storybook
Pre Cut Butterflies: Stampin' Up - Beautiful Butterflies Die and Butterfly Wings Embosslits Die
Misc.: Adhesives, Clear Embossing Powder, Darcie Rhinestones, Distress Tool, Heat Gun, Pop Up Dots, Stampin' Up Pretties Kit, Water mister and Zots

Tuesday, January 20, 2015

Angel

I included a couple of Cricut Cartridges in with my January Counterfeit Kit Renew as I wanted to do a layout or two using them.  I use the Cricut Design Studio to create my cards and layouts as I do not need to be hooked up to the internet to do the.  this is actually the second layout I did using the Cricut - I just couldn't get the first one to look right.

 
I started with the "Jazz" paper and misted the edges with water so that I could curl the edges up.  I used a distressing tool on the rest of the edges but also curled a little bit of the "Ballet" paper as well.
I cut the leaves and flower branch out using the Cricut, then painted them the dark brown with the acrylic paint dauber.  I used the same dauber on all of the edges of the cardstock.


A few flat backed pearls and flowers scattered around and the layout just needs pictures.


Thanks for stopping by.

January Counterfeit Kit - Renew
8  - 12x12 Layout
2 - 8 1/2 x 11 Layout

Recipe:
Counterfeit Kit - January Renew:
Paper: My Mind's Eye - Penny Lane Tiny Dancer "Ballet" and "Jazz"; Prima Angelique Collection "Wings"; Stampin' Up - blue; DCWV - Tan Cardstock and Unknown tan cardstock
Acrylic Paint: Adirondack Acrylic Paint Dauber - Espresso
Punch: Stampin' Up - 2 1/2" Circle
Cricut Cartridges: George and the Basic Shapes, Home Accents and Storybook
Misc.: Adhesives, Distress Tool, Flowers and Leaves, Heat Gun, Stampin' Up Pretties Kit, Water mister and Zots

Sunday, November 24, 2013

Autumn Memories Mini Album

Welcome to the CKCB Member's Blog Hop.  This month the challenge was to create a So Thankful Mini Album.  You should have arrived from Dawn. If you just stopped by you can go to the start of the hop by clicking here.  Now my album does not have pictures in it yet but will shortly after Thanksgiving.  I should have lots of  family here for most of Thanksgiving week. 


My November Counterfeit Kit Challenge included a set of paper just for my mini album just as the Jenni Bowlin's October 2013 Kits included a mini album option. For my mini album I'm going to use my Cricut for my pages and I'm using an album from Paisleys & Polka Dots for my inspiration. I just love how she uses various shapes to make a mini album.


I started by cutting the house from Beyond Birthdays. To Cover the front I used DCWV The Timeless Texture Stack then layered various hearts using the George cartridge and the fence is from the Heritage cartridge.  The tag is inked then stamped, embossed and tucked behind the fence.  I added a raffia bow then some left over pumpkins, a few rhinestones, silk leaves and I'm done.  I actually decorate the front of the album last. The does slide out sot that I can journal on the back.


The inside cover has some stamped pumpkins and leaves mounted onto photo corners.  I punched a few of the two smaller size labels for journaling. I added a couple of layers behind the photo mat then a few rhinestones and pearls.


I had a hard time adding elements to the leaf page. I was not happy with the color combination on this paper, it just didn't  match what I had in my stash. I finally just added a few of the punched labels for journaling and called it good.


The back side of the leaf was much easier.  I had a few stamped leaves left over and added them in here. One is clear embossed and the two in the lower corner has stickles on them.  I did use pop up dots on the leaves.  I cut the shank off of the buttons then glued them to the page.

The front of the scallop page is has some hand cut banners, a few rhinestones, and a pre-punch curvy label for journaling.


The back of the scallop page I used more left over paper.  The scalloped orange and yellow paper was a left over piece of the edge of a pattern paper.  I thought it was perfect here


For the acorn I used the front and back of this paper.  This is one I added to the kit and I do not know the name of it.  I had a little bit of trouble cutting this side as I forgot to flip the design before I cut so I needed another sheet of paper.  A few buttons and a stamped frame finish off the page.


The back of the acorn I think is my favorite page.  I just love how the scarecrow stamped image turned out. I have the scarecrow on pop up dots and the frame is not glued down on the left side so that a photo can slide under. I used the bird punch and just offset the brown layer for a shadow effect. 


For the last page I used some more of the raffia and some scraps.  The punched label at the bottom of the page only has the bottom portion attached so that a photo can slide underneath. 


The back page is the back side of the Pink Paislee 365 Degrees "Daydream" paper.  I was intending to use the orange side but liked blue side better. 


Thanks for joining me on the  Novembers CKCB Members Blog Hop.  Your next stop is Angela.

If you get lost along the way you just need to head back to the  Counterfeit Kit Challenge Blog to find your way back onto the hop.  I've also listed all of the participants below.


Angela http://colestoucan.blogspot.co.uk  (Next Blog)


Recipe:
Paper: Jenni Bowlin - Lemonade, Bo Bunny - Little Boy Blue - Gingham, My Mind's Eye - Miss Caroline, K&I - Peach Pit Pop Culture, Pink Paislee - Day Dream, House of Three - Music and Trellis, Crate Paper - Cottage Collection Rose Garden, Basic Grey - Lemonade Strawberry patch; Added to kit: DCWV The Timeless Texture Stack, various pieces of scraps from my scrap pile for the elements.
Cricut Cartridges: Beyond Birthdays, Heritage, Paper Dolls for Everyday, Mini Monograms,  B is for Boy, CTMH Art Philosophy, George.
Stamps: Unity Kit of the Month /august 2013 {cozy moments} and
Ink: Inkadinkadoo - burgundy; Stampin' Up - wild wasbi, pumpkin, Stazon - brown and black
Punch: EK Success - labels, Scroll dots; Stampin' Up - Spiral Border Scallop Trim; Martha Stewart - Birds on a wire, photo corners.
Embossing Folder: Stampin' Up - Designer Frame
Misc.: Zot, pop up dots, adhesive, glossy accents, rhinestones, pearls, buttons, various trims, embroidery yarn and floss, silk leaves, Xyron, raffia.

Saturday, November 16, 2013

This Week - Happy Birthday

Last month was my first month of actually making a Counterfeit Kit and scrapping from that kit.  This month I told myself I would participate in a few of the challenges as well.  My mini album is done and waiting for the day I can reveal it.  So I thought I should do more than one challenge and the second is the Counterfeit Kit Challenge #2: Color Change.

 
  Well I've changed the color of two things on my layout - the circle and the alphabet "happy birthday"   I used Design Studio to size and place my elements before I cut them out. 

 
While my elements for the layout were cutting I altered the colors of the circle on my layout.  I spread a few of the distress inks onto may mat and spritzed them with water then ran my circle through it a couple of times until I was happy with the coverage.  The paper is the same paper as the photo mats.  I do not know the color or where it is from as it's from my mom's stash.
 

The second thing I altered was the "happy birthday". I cut this out of chipboard from the back of a paper pad.  I used embossing ink and then embossing powder to make them the bright orange. 


My oldest has a birthday this month I thought this would be perfect for his pictures.  As I was writing this post I decided to check out the pre-made envelopes I have and added one behind the two smaller picture photo mats. 

Thanks for stopping by.

Counterfeit Kit Challenge -  November
7 - 12 x 12 layouts
4 - 8 1/2 x 11 layouts
1 - Altered project
1 - Mini Album ( have to wait to see it on the blog hop, November 24th)
 
Recipe: 
Cardstock: The Paper Company - Color Connect Diamonds White; Added to Kit: DCWV - olive green, blue and silver glitter paper; Stampin' Up - Vellum; Unknown scraps of pattern paper and tan for photo mats ( this is the same paper used for the challenge - circle on my layout; Chipboard - back of a package of 12x12 paper
Ink: Distress Ink -  Scattered Straw, Peeled paint, rusty hinge, dried marigold, broken china; Martha Stewart - stem green and leaf bud; Embossing Ink
Embossing Powder: Stampin' Up - Tangerine Tango
Cricut Cartridges: Martha Stewart Elegant, Martha Stewart All Occasions, George and Paper Lace II
Printables Tickets - Uprintables.blogspot.com; Labels -  Free print and cut from Happy-ness blog
Punch: Fiskars 1/8: circle punch; Stampin' Up - mini punch set.
Misc.: Adhesive, pop up dots, liquid adhesive, zots, toothpicks and leaf branch tape, mini envelope,  Pre-made bird from the Bird and bloom die,

Thursday, November 14, 2013

I can make it fit

I finally had a few moments to scrap and I pulled out my Paper Lace 2 Cricut cartridge.  I've been wanting to use the cogs that are on it on layout and I thought these photo's would be perfect.

 
Now I didn't have a mini alphabet that was a color I liked so I made my own.  I forgot to add the date and MR2 so that is had written. 


I pulled out some old photo's I haven't scrapped of my oldest working on his MR-2.  After he bought the car he was deployed and it has spent more time in storage than he has been able to drive it. It's a good thing that he knows how to fix cars, one of his many talents. 

Thanks for stopping by.

Counterfeit Kit Challenge -  November
4 - 12 x 12 layouts
2 - 8 1/2 x 11 layouts
1 - Altered project
1 - Mini Album ( have to wait to see it on the blog hop, November 24th)

Recipe:
Cardstock: Rhonna Farrer - Blue Twist: Added to Kit: DCWV - orange cardstock, Unknown - rust and blue pattern papers
Cricut Cartridge: George and the Basic Shapes, Paper Lace 2
Ink: Autumn Leaves - Brown
Embossing Folder: Tim Holtz - Steampunk
Misc: Adhesive, pop up dots, wet glut, Mini Alpha's

Sunday, July 28, 2013

Missing You Everyday

Hi everyone, thanks for stopping by my blog.  Today I'm the Designer at the Card A Day Blog and I'm starting off a new theme this week of "Your Choice".  I've had this card on my Design Studio for ages and decided I would like to get it done.  Where I've used the Cricut you can use any die cut or punch you have.


I started off by cutting my lace, hearts and heart outlines using Design Studio. 


For the inside I added a little strip of the background paper to the left side and inked all the edges with burgundy ink. 
 

So what kind of card would you like to make for your "Challenge" today? I hope you enjoyed today's card. Thanks for stopping by.

2 cards for OWH.

Cricut Cut:
Lace: Paper Lace 2 Button 4 - cut at  3 3/4"
Hearts: George and the Basic Shapes - cut at 1 3/4
Heart Outline: George and the Basic Shapes - cut at 1 3/4

Cutting Instructions:
Card Base: Brown Card stock - 8 1/2" x 5 1/2"; scored at 4 1/4"
 Background Paper: Floral pattern paper - 4" x 5 1/4"
 Yellow paper - 3 1/4" x 3 1/4"

Recipe:
Paper: Recollections - white and cream; Archiver's - Spring Blossoms Paper collection
Ink: Distress Ink - Vintage Photo; Versa Magic - midnight black; Inkadinkadoo - burgundy
Stamps: Unity Kit of the Month - February 2013 {let love grow}
Cricut Cartridges: George and the Basic Shapes, Paper Lace
Misc.: Adhesive, Recollections - pearl.

Sunday, July 14, 2013

4th of July

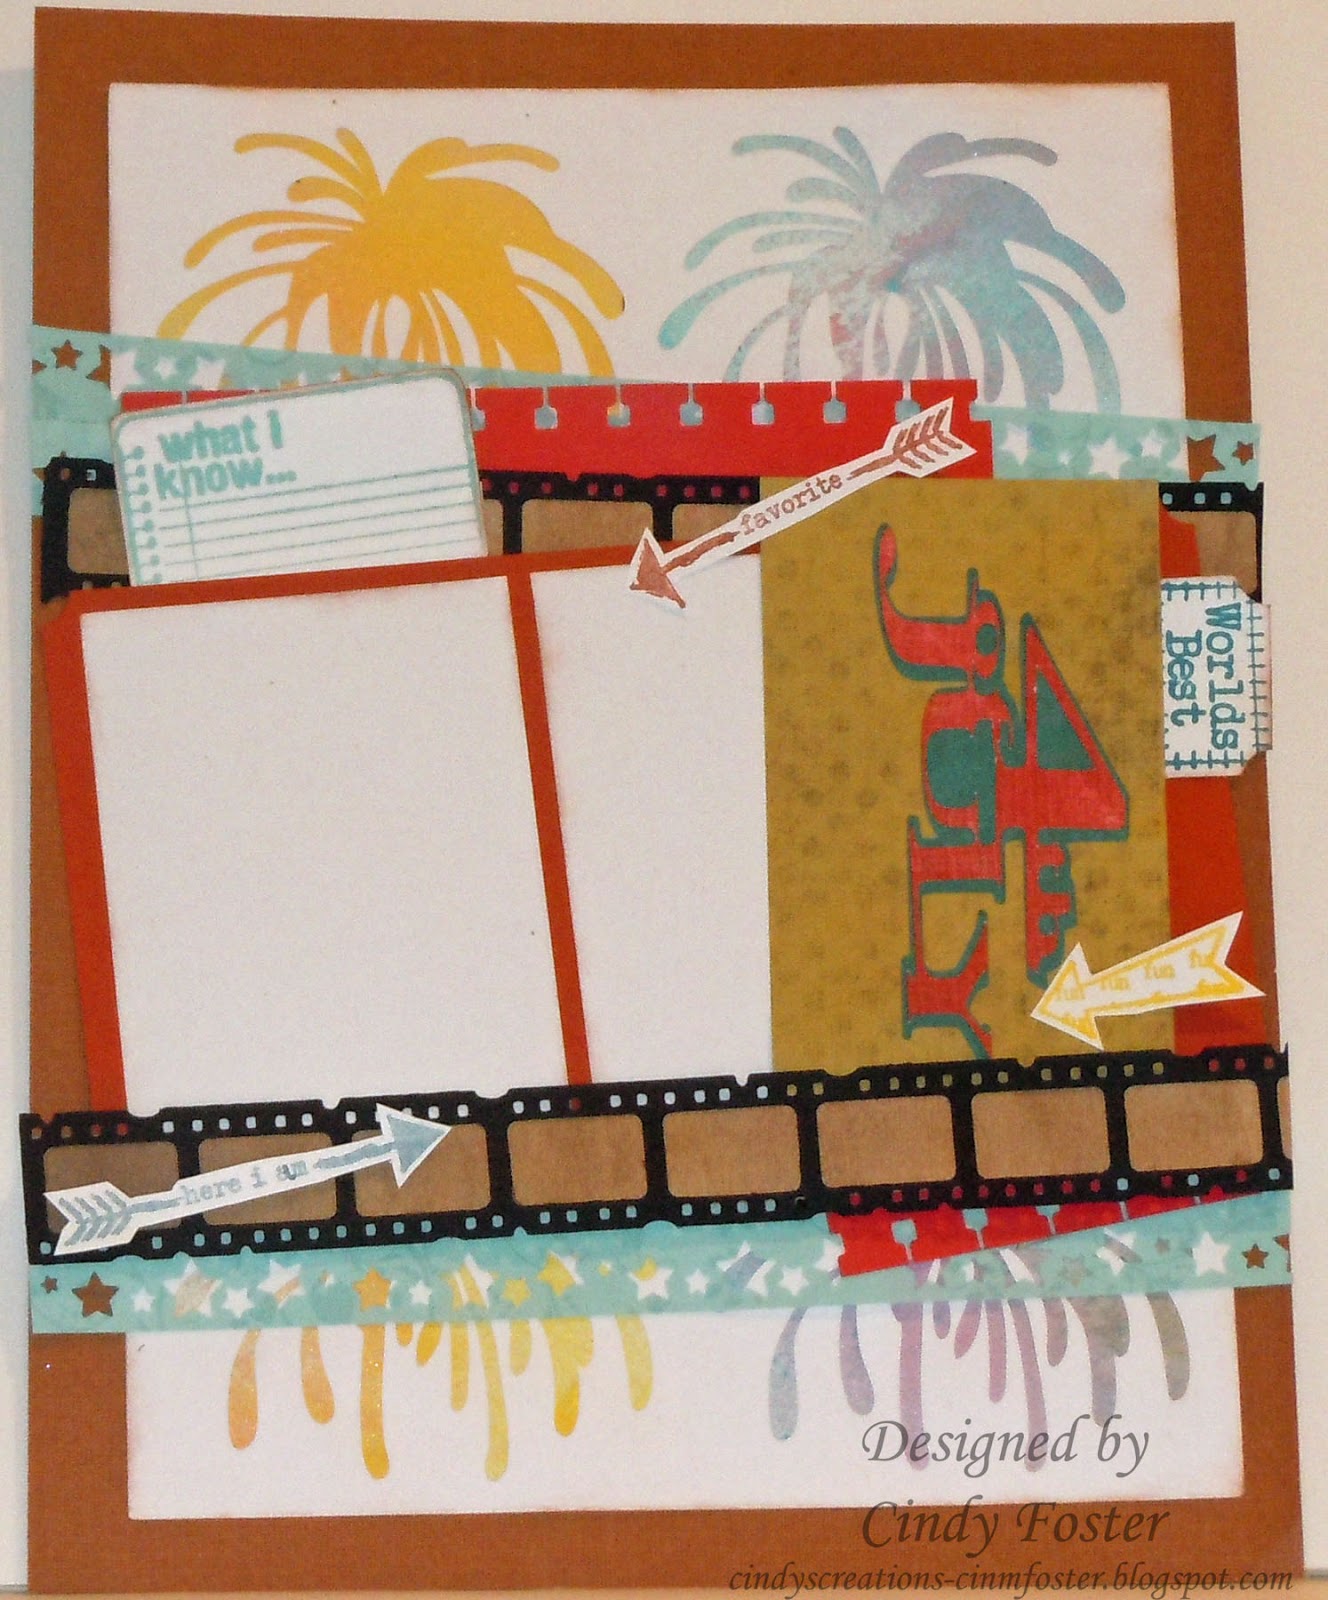
Here's a couple of layouts for my Guys' albums.  I used the 213 in 2013 Challenge at Two Peas In a Bucket for these layouts.  I've been working on pages for other people and needed a break from it.  The guys will add the photos to their layouts so I used white card stock where the photos go. 
 

I started out using my Cricut cut the fireworks outs of white card stock.  I then glimmer misted another piece of white card stock with yellow, red and blue, cut strips to fit behind my firework mat and glued everything to a piece of brown card stock.  I then started the layering process. 

 
The photos just do not do them justice.
 
Out of the five creative prompts I did four on these layouts. 

1. Cut your background with your Silhouette - I used my Cricut.
2. Add texture to using stitching within a design - did not do this.
3. Glue your pictures diagonally - did this.
4. Use a stencil as your main title - cut with my Cricut.
5. Use stamps as embellishments on your layout - used lots of stamps and hand cut them out.

Thanks for stopping by.

Entered in the 213 for 2013 July 8, 2013

Recipe:
Paper: DCWV - The Heirloom Stack, red, and textured brown; Recollections - white, black and orange; Unknown - red
Stamps: Unity Kit of the Month - August 2011 {what I know}, October 2012 {from ours to yours}, November 2012 {so into you}
Ink: Inkadinkdoo - burgundy; Martha Stewart - dark blue, ocean; Versa Mark - Aegean Blue, Coffee Bean; Color Box - Yellow
Glimmer Mist:  Tattered Angels - Yellow Daisy, Jazzy Blue; I made the Red
Die: Tim Holtz - mini filmstrip
Punches: Stampin' Up - Ticket corner, corner rounder, Spiral Border; EK Success - Starry Night
Cricut Cartridges: George and the Basic Shapes and Stand & Salute
Misc.: adhesive, pop up dots

Wednesday, June 12, 2013

Let Liberty Ring

Hi everyone and welcome to the continuation of the Country's Birthday at the Card A Day Blog.  Well I've been saving this piece of blue stars on the red paper for a layout and just haven't used it so I decided I would use it with the Liberty Bell for my card.  I combined it with the red metallic paper that I embossed with the stars folder.

 
The Liberty Bell is cut from the Stand and Salute Cartridge.  I cut it out of a scrap of DCWV silver metallic paper then inked it with burgundy ink to make it a little bit aged.  I added a blue ribbon at the bottom of the page.


I cut the stars paper again for the inside of my card then added a white journaling mat cut so there is a star border around the mat.

Thanks for stopping by.

Cutting Instructions:
Card Base: Blue Card stock - 8 1/2" x 5 1/2",  scored at 4 1/4"
Star Embossed layer: 4" x 5 1/4" then embossed


Recipe:
Paper: Cardstock - Recollections - blue and black; DCWV - silver; Unknown - red metallic, blue and red stars
Ink: Inkadinkadoo - burgundy
Ribbon: American Crafts - Denim
Cricut Cartridges: George and the Basic Shapes, Lacey Labels and Stand and Salute.
Embossing Folder: Cuttlebug - Stars

Saturday, April 13, 2013

Happy Spring

Thanks for joining me from the Card A Day Blog, today we are celebrating Spring.  I'm ready for spring but it is still winter here and still snowing.  I have a quick card to share with you today; it's quick because I used the Cricut to do most of the work.

I cut the girl watering flowers from the A Child's Year Cartridge out of black card stock, the scallop circle is from the Lacy Labels cartridge and the light peach circle is from George and the Basic Shapes cartridge.

Out of the light peach cardstock I stamped the butterfly and punched it out and punched the border strip. I added the ribbon to cover up my edges then topped it off with a bow, a black button with a double bow and my punched butterfly.


Using the same butterfly stamp I stamped them onto the white mat on the inside of the card.


Thanks for stopping by. Tomorrow Vicki Schram is the Designer for the Card A Day Blog.  Don't forget to enter you card in the challenge this month.

Cutting Instructions:
Card Base: 5 1/2" x 8 1/4", scored at 4 1/4"
Gray Mat: 3 3/4" x 5"
Pattern Paper: 3 1/2" x 4"
Light Peach: 1 1/5" x 4", then punched

Inside:
Gray: 4" x 5 1/4"
White: 3 3/4" x 5"

Recipe:
Paper: Cardstock - Recollections; Pattern Paper - Unknown from my scrap pile
Stamp: Close to my Heart - Sentiments
Ink: Stazon - Jet Black
Ribbon: Celebrat It 5/8"; White embroidery floss
Punch: 1" Circle Punch; Martha Stewart - Floral Lace Edge border punch
Cricut Cartridges: A Child's Year, George and the Basic shapes, Lacy Labels,
Misc: Glue dots, adhesive

Saturday, February 2, 2013

Heart Box Mini Album

I created this mini album to fit into the small box of chocolates that come in a heart shape.  This is going to be a long post.  Remember that you can click on a picture to enlarge it if you want a closer view.


I used a variety of silk flowers and Prima flowers throughout this mini album.  The key, rose and black pearl were pickup from Michael's on their clearance rack last year.  I had planned to use in on a different project and didn't.  I even have a few berries left over from a Christmas Album that I tuck in on the side. 


I used a sheer red ribbon tied in a bow on the top and glued the same ribbon wrapped around the side of the box.  The bow was tied separately then attached to the box.


Because of the size of my box I was limited by the number of pages and the amount of embellishing I could do. I used George and Design Studio to cut my hearts out and I have a total of 5 pages. Each page has a Stampin' Up Grommet in the corner and I used a bunch of left over shades of red yarn to tie the album together.


For the cover I added another stick pin, silk and Prima flower a few rhinestones.  I stamped the image punched it out and then covered it with glossy accents.  Everything is attached on the right side so that a photo can slide behind the embellishments.


I alternated the side that the embellishments were to help keep the bulk down.  The flower is one that I crocheted for a swap, I just added a white Flower behind it.  The little heart sequin was in a kit from Scrapbook Heaven. 

For page two I used the "love" rhinestone sticker's on the decorative label punch with a couple more flowers. 


I added a red heart paperclip to the side of page 3 which is decorated on the other side and then just slid onto this page.


I used glossy accents to glue the button, wish ticket, and heart paper clip together.  I then added a little bit of beaded trim.  This was from another project and I had it on my desk so I used it here.


Page four has another stamped, glossed accents and punched image along with a a flower, punched tag and pearls on a string.


The back of page 4 and page 5 are withouth embelishments. 


The back of page 5 has another stamped, glossed accents and punched image, a couple of flowers and a couple of die cut pieces. 


Page 5 is my last page for this album.  I added a couple more flowers, a rhinestone and a die cut.  The back of this page is the same paper as the front of the album and I did not take a picture of it. 


Thanks for stopping by.

Recipe:
Paper:  Recollections Cardstock - Cream, DCWV - The Immortal Love Stack - red cardstock and the top of the box; Stampin' Up - Designer Series Paper - Love Letters
Stamps: Inkadinkadoo - Flourishes, Heartful of Love
Punches: Stampin' Up - Decorative Label, Tag Punch, Postage Stamp, Designer Label Punch
Die: Sizzlits - Medium Label Set #4
Rhinestones: Gartners Studios - "love"; unknown Swirl
Pins: The pins on the front are from a swap I did last year.  I think they look beautiful on this layout.
Ribbon: Offray Sheer Ribbon
Misc.: 4" round doily, flowers - Prima and Silk, beads for pins, Pearls on a string; Heart Paper clip, buttons, half pearls for flower centers, Tim Holtz - wish ticket, sequins, glossy accents, pop up dots, adhesive
Crochet Flowers - are some I made for prior swaps or other projects.