Hi everyone and thanks for hopping on over from the Card A Day Blog. Today we are creating Teacher Appreciation Cards. I used the Crate Paper that I had pulled out for March Counterfeit Kit for the background. I stamped the stacked books and book worm onto white cardstock and cut then out. I added the ruled paper after stamping the apple border and using a punch on the side.
The bookworm is on pop up dots and looks like he's attached to the paper clip. A strip of ribbon with a bow on the side finishes it off.
For the inside I punched a piece of the background paper and layered onto the white mat.
Now I don't send out Teacher Appreciation cards so I'll be sending this one to my sister for her grandson.
Thanks for stopping.
Counterfeit Kit Challenge - March
10 - 12x12 layout
2 - 8.5 x 11 layout
5 - Cards
Cutting Instructions:
Card Base: 8 1/2" x 5 1/2", scored at 4 1/4"
Background paper: 41/4" x 5 1/4"
Ruled Paper: 3 5/8 x 4 1/4"
Inside pattern piece: 5 1/4" x 4"
Recipe:
Paper: DCWV Cardstock, The Everyday Essential Stack, white cardstock; Crate Paper - Static Collection "Tight"
Stamps: Unity Kit of the Month August 2012 (Colors of the Seasons} - the apples, December 2012 {everyday fairytale} - the book stack; Stampin' Up - First Day - Bookworm
Ink: VerssaMagic - Spanish Olive; Colorbox - brown and red
Punch: Stampin' Up - Spiral Border
Ribbon: Stampin' Up - 1/2" Pear Pizzazz Seam Binding
Misc.: adhesive, green paperclip, pop up dots, and scissors
Showing posts with label Card A Day Blog. Show all posts
Saturday, April 19, 2014
Saturday, April 5, 2014
Heartfelt Sympathy
Hi everyone and thanks for joining me from the Card A Day Blog. I'm the designer of the day and I'm finishing off the week with out theme of Sympathy Cards. I pulled the pink paper from my March Counterfeit Kit after making my Lovely Day layout as part of the blog hop
I started by embossing the white cardstock with the framed tulip folder. I then trimmed off just a bit to make it fit onto the card and inked the edges a little bit of the embossing to make it stand out.
I then stamped the center image onto white cardstock and stamped the butterfly and cut it out and layered everything together.
For the inside I kept everything pretty simple and stamped the sentiment with dove gray ink, leaving plenty of room for my message. By the time this posts I will have already mailed it out.
Thanks for stopping.
Counterfeit Kit Challenge - March
10 - 12x12 layout
2 - 8.5 x 11 layout
4 - Card
Cutting Instructions:
Card Base: 8 1/2" x 5 1/2", scored at 4 1/4"
White cardstock for the Embossing Folder: 41/4" x 5 1/4", after embossing trimmed down again
Stamped image: 3 5/8" x 2 5/8"
Pink Cardstock: 4 7/8" x 2 7/8"
Inside pattern piece: 5 1/4" x 4"
Recipe:
Cardstock: DCWV - White, Stampin' Up - pink
Stamp: Stampin' Up -DCWV - Bliss; My Sentiments Exactly - sentiment
Ink: Colorbox pink; Stazon On - Dove Gray
Embossing folder: Stampin' Up - Framed Tulips
Misc.: adhesive, scissors, Zots.
I started by embossing the white cardstock with the framed tulip folder. I then trimmed off just a bit to make it fit onto the card and inked the edges a little bit of the embossing to make it stand out.
I then stamped the center image onto white cardstock and stamped the butterfly and cut it out and layered everything together.
For the inside I kept everything pretty simple and stamped the sentiment with dove gray ink, leaving plenty of room for my message. By the time this posts I will have already mailed it out.
Thanks for stopping.
Counterfeit Kit Challenge - March
10 - 12x12 layout
2 - 8.5 x 11 layout
4 - Card
Cutting Instructions:
Card Base: 8 1/2" x 5 1/2", scored at 4 1/4"
White cardstock for the Embossing Folder: 41/4" x 5 1/4", after embossing trimmed down again
Stamped image: 3 5/8" x 2 5/8"
Pink Cardstock: 4 7/8" x 2 7/8"
Inside pattern piece: 5 1/4" x 4"
Recipe:
Cardstock: DCWV - White, Stampin' Up - pink
Stamp: Stampin' Up -DCWV - Bliss; My Sentiments Exactly - sentiment
Ink: Colorbox pink; Stazon On - Dove Gray
Embossing folder: Stampin' Up - Framed Tulips
Misc.: adhesive, scissors, Zots.
Friday, March 28, 2014
Easter Greeting
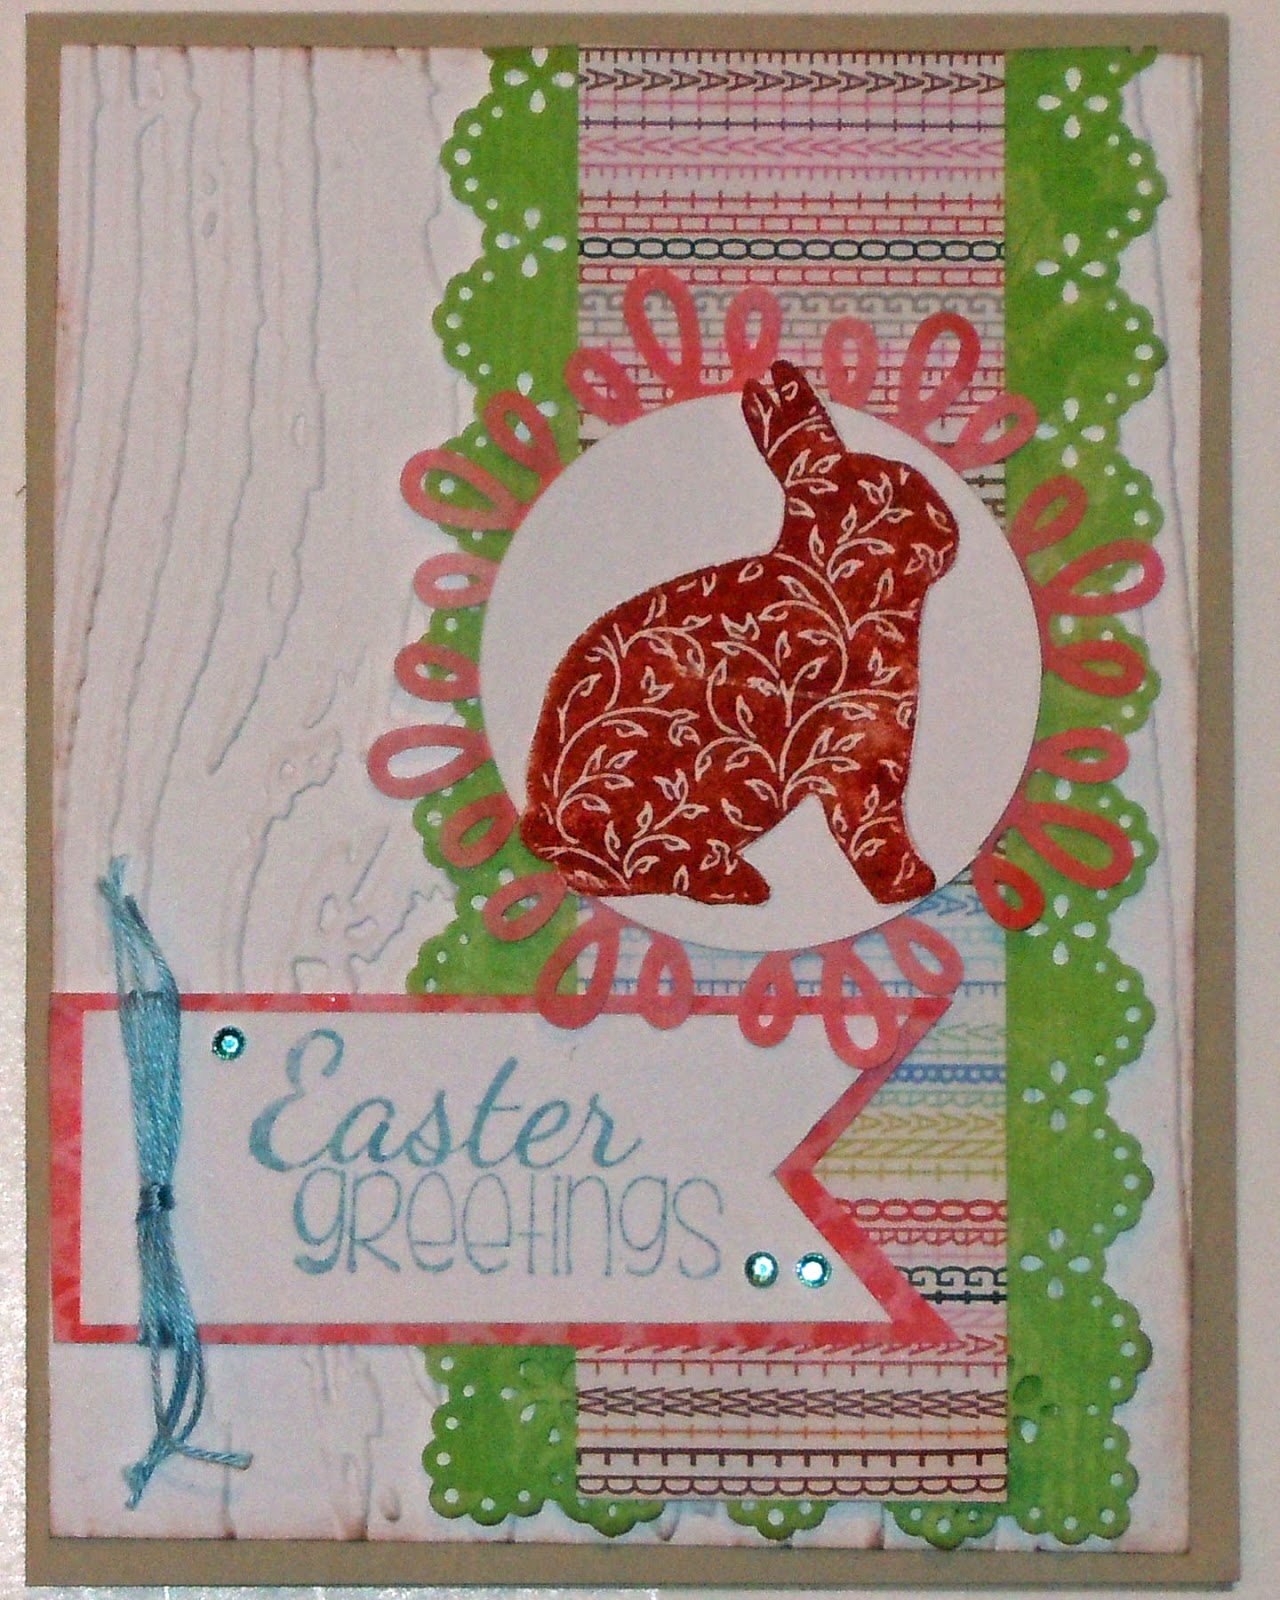
Hi everyone, thanks for joining me from the Card A Day Blog. This week the theme is Easter and I'm using the bunny and greeting from the February {Grow into Spring} kit.
I started by stamping the Bunnie with chocolate ink and cutting him out. I then cut a 3" circle and used the Loop corner punch to go around the circle to make a pretty mat. The white circle is cut at 2". The white cardstock is embossed with the Woodgrain embossing folder. I used the EK Success 2 Point Flag to punch the flag end only and trimmed down the white cardstock
I used the corner and edge punch on the for the green paper. Tip - the green border is in two pieces and the bottom edge is lined up to match then the stripe paper is layered on top. You can see all the layers from the side. I stamped the Bunnie again and added him to the inside of the card.
Thanks for stopping by.
Counterfeit Kit Challenge - March
10 - 12x12 layout
2 - 8.5 x 11 layout
3 - Card
Entered into:
Unity Stamps: Friends with Flair
Cutting Instructions:
Card Base: 8 1/2" x 5 1/2", scored at 4 1/4"
White Embossed layer: 4" x 5 1/4", then embossed
Green punched edges: Cut two at 1 1/2" x 6", corner punch then punch the edge. (Trim when putting card together)
Stripe Paper: 1 1/2" x 6" (Trim when putting card together)
Recipe:
Recollection: white and tan cardstock; Green and pink pattern paper;
Stamps: Unity kit of the Month February 2014 {Grow into Spring}
Ink: Color Box Brown; Versamagic - Aegean Blue; Inkadinkadoo - burgundy
Rhinestones: My Mind's Eye - fine and dandy "true blue bling"
Punches: EK Success - 2 Point Flag; Martha Stewart - Loopy and Eyelet Lace
Embossing Folder: Tim Holts - Woodgrain
Misc.: Adhesive, blue embroidery thread, Fiskar's Circle template
I used the corner and edge punch on the for the green paper. Tip - the green border is in two pieces and the bottom edge is lined up to match then the stripe paper is layered on top. You can see all the layers from the side. I stamped the Bunnie again and added him to the inside of the card.
Thanks for stopping by.
Counterfeit Kit Challenge - March
10 - 12x12 layout
2 - 8.5 x 11 layout
3 - Card
Entered into:
Unity Stamps: Friends with Flair
Cutting Instructions:
Card Base: 8 1/2" x 5 1/2", scored at 4 1/4"
White Embossed layer: 4" x 5 1/4", then embossed
Green punched edges: Cut two at 1 1/2" x 6", corner punch then punch the edge. (Trim when putting card together)
Stripe Paper: 1 1/2" x 6" (Trim when putting card together)
Recipe:
Recollection: white and tan cardstock; Green and pink pattern paper;
Stamps: Unity kit of the Month February 2014 {Grow into Spring}
Ink: Color Box Brown; Versamagic - Aegean Blue; Inkadinkadoo - burgundy
Rhinestones: My Mind's Eye - fine and dandy "true blue bling"
Punches: EK Success - 2 Point Flag; Martha Stewart - Loopy and Eyelet Lace
Embossing Folder: Tim Holts - Woodgrain
Misc.: Adhesive, blue embroidery thread, Fiskar's Circle template
Labels:
Card A Day Blog,
cards,
Counterfeit Kit Challenge,
Easter,
Unity Stamps
Saturday, March 22, 2014
Congratulations!
Hi everyone, today I'm the Designer over at Card A Day Blog and I'm ending this week's theme of Congratulation Cards. I had sitting on my desk the Stampin' Up Designer Frame embossing folder and decided to start with that and the speckled background paper that I pulled for my March Counterfeit Kit I did a search through a couple of stamps trying to find one to fit inside the frame.
I stamped the heart butterfly onto white card stock and lightly inked the edges with vintage photo after cutting it down to size. I have it on pop up dots for some added dimension. I added the ribbon to the side along with a rhinestone brad that I've had forever.
I kept the inside really simple as I don't have a purpose for this card yet. Thanks for stopping by.
Counterfeit Kit Challenge - March
6 - 12x12 layout
1 - 8.5 x 11 layout
2 - Card
Cutting Instructions:
Card Base: 8 1/2" x 5 1/2", scored at 4 1/4"
Pattern Paper: 4" x 5 1/4"
Orange cardstock: 3 1/2" x 3 1/2"
Stripe Paper: 4 1/8" x 1 1/2"
Inside pattern piece: 5 1/4" x 4"
Recipe:
Paper: Recollections - Kraft and white cardstock; Provo Craft - The Slab III; Unknown orange and pattern paper
Stamp: Unity Kit of the Month December 2012 - {everyday fairytale}; Sentiments II
Rhinestones: My Mind's Eye - fine and dandy "true blue bling"; Unknown rhinestone brad
Ink: Stampin Up - Poppy Parade; Distress Ink - Vintage Photo
Embossing Folder: Designer Frames
Misc.: Adhesive, pop up dots, scissors, scrap of ribbon.
I stamped the heart butterfly onto white card stock and lightly inked the edges with vintage photo after cutting it down to size. I have it on pop up dots for some added dimension. I added the ribbon to the side along with a rhinestone brad that I've had forever.
I kept the inside really simple as I don't have a purpose for this card yet. Thanks for stopping by.
Counterfeit Kit Challenge - March
6 - 12x12 layout
1 - 8.5 x 11 layout
2 - Card
Cutting Instructions:
Card Base: 8 1/2" x 5 1/2", scored at 4 1/4"
Pattern Paper: 4" x 5 1/4"
Orange cardstock: 3 1/2" x 3 1/2"
Stripe Paper: 4 1/8" x 1 1/2"
Inside pattern piece: 5 1/4" x 4"
Recipe:
Paper: Recollections - Kraft and white cardstock; Provo Craft - The Slab III; Unknown orange and pattern paper
Stamp: Unity Kit of the Month December 2012 - {everyday fairytale}; Sentiments II
Rhinestones: My Mind's Eye - fine and dandy "true blue bling"; Unknown rhinestone brad
Ink: Stampin Up - Poppy Parade; Distress Ink - Vintage Photo
Embossing Folder: Designer Frames
Misc.: Adhesive, pop up dots, scissors, scrap of ribbon.
Friday, March 14, 2014
Welcome Spring
Hi everyone, thanks for joining me today from the Card A Day Blog. This weeks theme is all about Spring cards. What says spring more than the tulips coming up and butterflies. I am ready to see the snow gone and some green buds popping up!
For my card I'm using some of my March Counterfeit kit. I started with the tulip stamp by measuring my stamp and cutting my piece of cardstock down to size. I then stamped the image and trimmed it down a little bit more. I punched a lighter shade of green from the Summer Dreams stack and added it to the bottom with a piece of ribbon on top. My stamped image is up on pop up dots to add a little bit more dimension.
The butterfly was punched and in my baggie of pre-punched items to add to cards and layouts, so I have no idea where the paper is from. I embossed the butterflies with the polka dots folder to add some more dimension and added a couple of rhinestones to the center.
Thanks for stopping by.
Counterfeit Kit Challenge - March
4 - 12x12 layout
1 - 8.5 x 11 layout
1 - Card
Entered into:
Unity Stamps: Friends with Flair
Cutting Instructions:
Card Base: 8 1/2" x 5 1/2", scored at 4 1/4"
Pattern Paper: 4" x 5 1/4"
Embossed paper: 3 34" x 3 1/4"
Stamped Image: 3 1/4" x 2 3/4", then trimmed down
Inside pattern piece: 5 1/4" x 4"
Inside white: 3 3/4" x 5"
Recipe:
DCWV - Summer Dreams Paper Stack and white card stock
Stamp: Unity Stamps - Kit of the Month November 2013 {Strength & Dignity}
Ink: Stampin' Up - Poppy Parade
Punch: Martha Stewart - Double Arches
Die: Stampin' Up - Beautiful Butterflies
Embossing Folder: Cuttlebug - Polka Dots and Textile
Rhinestones: My Mind's Eye - fine and dandy "true blue bling"
Misc.: Adhesive, Cuttlebug, Pop up dots, and scissors.
For my card I'm using some of my March Counterfeit kit. I started with the tulip stamp by measuring my stamp and cutting my piece of cardstock down to size. I then stamped the image and trimmed it down a little bit more. I punched a lighter shade of green from the Summer Dreams stack and added it to the bottom with a piece of ribbon on top. My stamped image is up on pop up dots to add a little bit more dimension.
The butterfly was punched and in my baggie of pre-punched items to add to cards and layouts, so I have no idea where the paper is from. I embossed the butterflies with the polka dots folder to add some more dimension and added a couple of rhinestones to the center.
Thanks for stopping by.
Counterfeit Kit Challenge - March
4 - 12x12 layout
1 - 8.5 x 11 layout
1 - Card
Entered into:
Unity Stamps: Friends with Flair
Cutting Instructions:
Card Base: 8 1/2" x 5 1/2", scored at 4 1/4"
Pattern Paper: 4" x 5 1/4"
Embossed paper: 3 34" x 3 1/4"
Stamped Image: 3 1/4" x 2 3/4", then trimmed down
Inside pattern piece: 5 1/4" x 4"
Inside white: 3 3/4" x 5"
Recipe:
DCWV - Summer Dreams Paper Stack and white card stock
Stamp: Unity Stamps - Kit of the Month November 2013 {Strength & Dignity}
Ink: Stampin' Up - Poppy Parade
Punch: Martha Stewart - Double Arches
Die: Stampin' Up - Beautiful Butterflies
Embossing Folder: Cuttlebug - Polka Dots and Textile
Rhinestones: My Mind's Eye - fine and dandy "true blue bling"
Misc.: Adhesive, Cuttlebug, Pop up dots, and scissors.
Friday, February 21, 2014
Wishing You a Special Happiness . .
on this special day. Today I'm the designer over the Card A Day blog and we are creating Wedding Cards this week.
I started by stamping the sentiment and the bridge and groom on the white cardstock. I used an acrylic block that would hold both stamps so could stamp them at once. I then matted it in the yellow cardstock. I used the large print for my background and layered a doily cut in half and a pieces of the yellow on yellow cardstock with a bit of lace and pearl ribbon. I have the stamped images mounted onto foam tape.
I finished off inside to match the front of the card. Thanks so much for stopping by.
Recipe:
Paper: Stampin' Up - Beyond the Garden; DCWV - white and yellow cardstock
Stamp: Inkadinkado - Wedding/ Marriage; Dollar store doily
Ink: Color Box - Black
Celebrate It - lace and pearl ribbon
Misc.: adhesive, foam tape and scissors
I started by stamping the sentiment and the bridge and groom on the white cardstock. I used an acrylic block that would hold both stamps so could stamp them at once. I then matted it in the yellow cardstock. I used the large print for my background and layered a doily cut in half and a pieces of the yellow on yellow cardstock with a bit of lace and pearl ribbon. I have the stamped images mounted onto foam tape.
I finished off inside to match the front of the card. Thanks so much for stopping by.
Recipe:
Paper: Stampin' Up - Beyond the Garden; DCWV - white and yellow cardstock
Stamp: Inkadinkado - Wedding/ Marriage; Dollar store doily
Ink: Color Box - Black
Celebrate It - lace and pearl ribbon
Misc.: adhesive, foam tape and scissors
Wednesday, February 5, 2014
Heart Invitation
Today I'm the Designer over at Card A Day Blog and the theme is Invitation cards. When we moved to Minnesota DH's schedule was insane, long work hours and he never knew when he would be home, when he was home he was working. So for Valentine's Day I sent him an invitation requesting him to be home by a certain time for a Special Valentine Dinner and No Work Allowed. A Valentine Tradition was born - a relaxing meal for him and I get to try out new recipes. Here is my Heart Invitation for him this year.
I cut the two hearts from my Cricut, then outlined them with a white charcoal pencil. I tried the white gel pen and had to turn them over as it bled. I then used the charcoal pencil on the pattern paper, then the white gel pen.
I added various silk flowers and Prima flowers. The rolled silk roses are taken apart, cut in half and rerolled before I attached them to the card. To finish off the I used white pearls and outlined the double hearts with them.
The inside is pretty simple with a strip of pattern paper and a flower with a pearl which leaves me room to write my message.
Thanks so much for stopping by.
Cutting Instructions:
Card Base: 8 1/2" x 5 1/2", scored at 4 1/4"
Background: 4" x 5 1/2"
Hearts at 3 1/8"
Recipe:
Paper: DCWV - The Timeless Stack, white cardstock; Unknown burgundy cardstock
Pearls - Recollections white and brown
Flowers: Unknown Silk Flowers, Prima Flowers
Cricut Cartridge: George and the Basic Shapes - Heart with the shift button at 3 1/8"
Misc.: Adhesive, Generals - White Charcoal pencil, white gel pen
I cut the two hearts from my Cricut, then outlined them with a white charcoal pencil. I tried the white gel pen and had to turn them over as it bled. I then used the charcoal pencil on the pattern paper, then the white gel pen.
I added various silk flowers and Prima flowers. The rolled silk roses are taken apart, cut in half and rerolled before I attached them to the card. To finish off the I used white pearls and outlined the double hearts with them.
The inside is pretty simple with a strip of pattern paper and a flower with a pearl which leaves me room to write my message.
Thanks so much for stopping by.
Cutting Instructions:
Card Base: 8 1/2" x 5 1/2", scored at 4 1/4"
Background: 4" x 5 1/2"
Hearts at 3 1/8"
Recipe:
Paper: DCWV - The Timeless Stack, white cardstock; Unknown burgundy cardstock
Pearls - Recollections white and brown
Flowers: Unknown Silk Flowers, Prima Flowers
Cricut Cartridge: George and the Basic Shapes - Heart with the shift button at 3 1/8"
Misc.: Adhesive, Generals - White Charcoal pencil, white gel pen
Friday, January 24, 2014
Get Well Soon
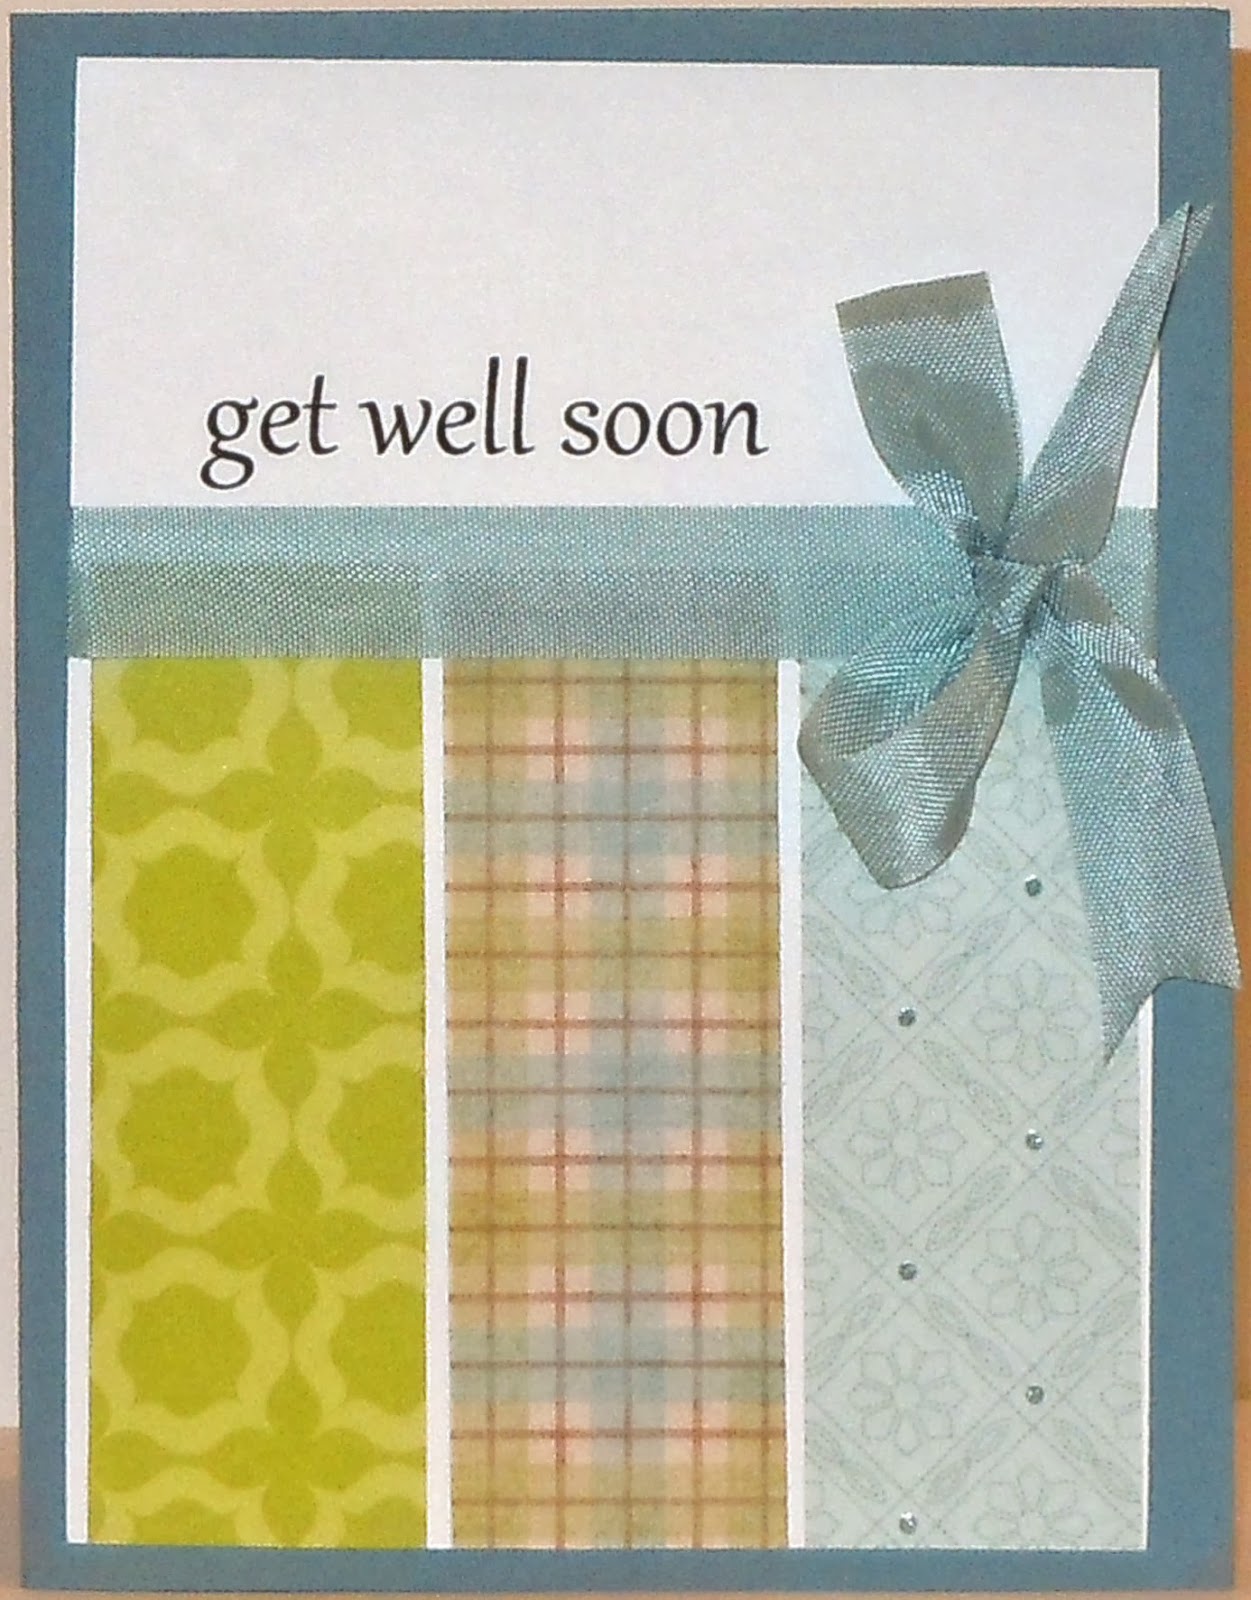
Today I'm the designer at Card A Day Blog and our weekly theme is "Get Well Soon".
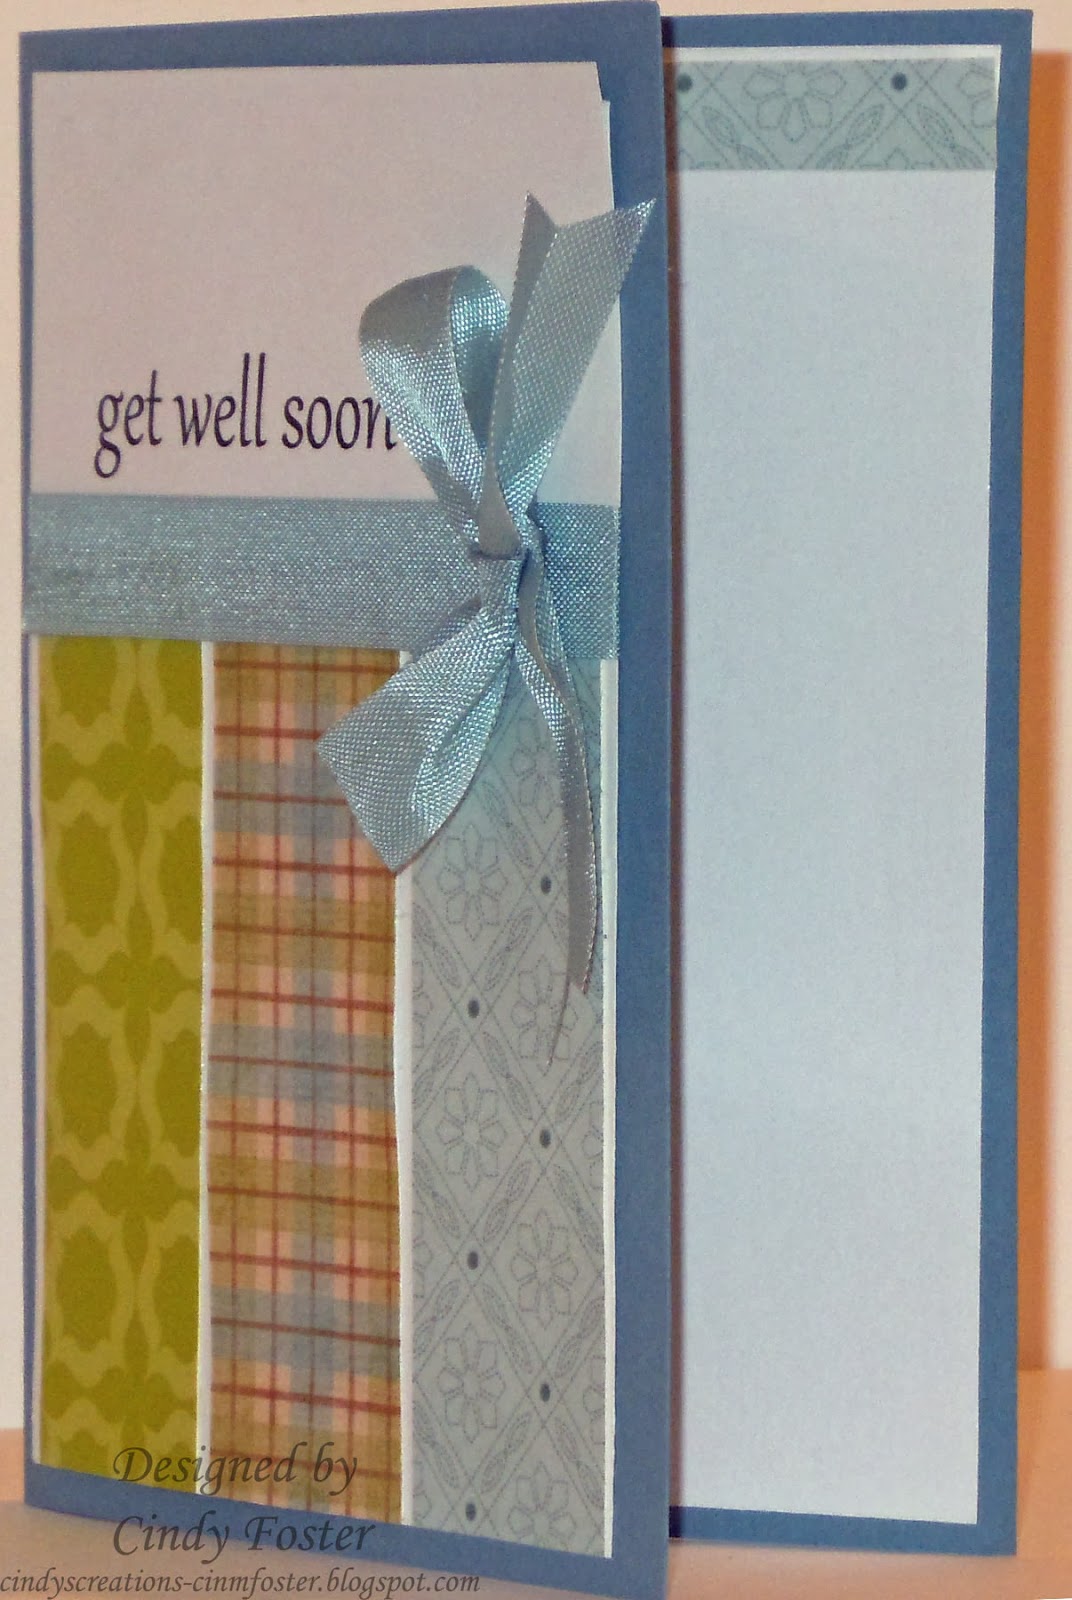
I normally use a Cricut cut for the "Get well soon" sentiment but today I used my computer. I printed out the sentiment onto plain paper until I got the size and position I wanted. I then printed it onto white cardstock. My pattern paper panels are each cut at 1 1/8" by 3 1/2" and are layered on the bottom of the white cardstock with white showing between the panels. I added the ribbon then glued everything to the card, made the bow and added it.
For the inside I added a small strip to the top of the card leaving a little bit of white cardstock showing through. No I did not ink any of my pieces and realized that after I had the card put together.
Tomorrow Debi Barber is the designer so be sure to stop in and see what she had to inspire you. Thanks for stopping by.
Cutting Instructions:
Card Base: 8 1/2" x 5 1/2", scored at 4 1/4"
White card base: 3 3/4" x 5 1/8".
Pattern paper Panels: 1 1/8" by 3 1/2"
Inside white: 4" x 5 1/4"
Recipe:
Cardstock: Recollections - white and blue cardstock; Unknown scraps of pattern paper.
Ribbon: Stampin' Up - 1/2" Seam Binding - Baja Breeze
Font: Gabriola at 36
I normally use a Cricut cut for the "Get well soon" sentiment but today I used my computer. I printed out the sentiment onto plain paper until I got the size and position I wanted. I then printed it onto white cardstock. My pattern paper panels are each cut at 1 1/8" by 3 1/2" and are layered on the bottom of the white cardstock with white showing between the panels. I added the ribbon then glued everything to the card, made the bow and added it.
For the inside I added a small strip to the top of the card leaving a little bit of white cardstock showing through. No I did not ink any of my pieces and realized that after I had the card put together.
Tomorrow Debi Barber is the designer so be sure to stop in and see what she had to inspire you. Thanks for stopping by.
Cutting Instructions:
Card Base: 8 1/2" x 5 1/2", scored at 4 1/4"
White card base: 3 3/4" x 5 1/8".
Pattern paper Panels: 1 1/8" by 3 1/2"
Inside white: 4" x 5 1/4"
Recipe:
Cardstock: Recollections - white and blue cardstock; Unknown scraps of pattern paper.
Ribbon: Stampin' Up - 1/2" Seam Binding - Baja Breeze
Font: Gabriola at 36
Labels:
Card A Day Blog,
cards,
Get Well Cards,
Scrap Pile
Thursday, January 16, 2014
Happy Valentine's Day
Today I'm the Designer over at the Card A Day Blog and we are celebrating Valentine's Day. (I do have cutting instructions at the bottom)
I've stamped my image onto a piece of green pattern paper then used clear embossing powder. I colored it in with some markers and matted it onto black cardstock. I used a piece of lace on the left hand side of the card instead of a piece of pattern paper. I wrapped a piece of embroidery yarn around the image and added the sentiment to the front of the card.
To finish off the inside I added a piece of the pattern paper to the bottom of the mat.
Thanks for stopping by.
Cutting Instructions:
White card base: 5 1/2" x 8 1/2", scored at 4 1/4"
Black: 4 1/8" x 5 3/8"
Blue: 4" x 5"
Pattern Paper: 3" x 4"
Recipe:
Paper: DCWV - Summer Dreams Stack, blue, white and black cardstock
Stamp: Unity Stamp's December 2013 Kit of the Month {Happy love Day}
Ink: Stazon Ink - Jet Black
Markers: Stampin' Up Stamp and Write - Melon Mamba and Zig Brushables - Cool Cucumber
Misc.: scrap of lace, blue embroidery thread, pop up dots, adhesive
I've stamped my image onto a piece of green pattern paper then used clear embossing powder. I colored it in with some markers and matted it onto black cardstock. I used a piece of lace on the left hand side of the card instead of a piece of pattern paper. I wrapped a piece of embroidery yarn around the image and added the sentiment to the front of the card.
To finish off the inside I added a piece of the pattern paper to the bottom of the mat.
Thanks for stopping by.
Cutting Instructions:
White card base: 5 1/2" x 8 1/2", scored at 4 1/4"
Black: 4 1/8" x 5 3/8"
Blue: 4" x 5"
Pattern Paper: 3" x 4"
Recipe:
Paper: DCWV - Summer Dreams Stack, blue, white and black cardstock
Stamp: Unity Stamp's December 2013 Kit of the Month {Happy love Day}
Ink: Stazon Ink - Jet Black
Markers: Stampin' Up Stamp and Write - Melon Mamba and Zig Brushables - Cool Cucumber
Misc.: scrap of lace, blue embroidery thread, pop up dots, adhesive
Labels:
Card A Day Blog,
cards,
Unity Stamps,
Valentine's Day
Saturday, January 11, 2014
Double Heart Valentine
Hi everyone, thanks for joining me and the Card A Day Blog to celebrate Valentine's Day. I started with a couple of scraps from my Summer Dreams Stack to make the backgrounds on my card.
I then added a punched border between the two layers to dress it up a bit. I used a Martha Stewart punch and punched three of the hearts out. I hand cut the pennant and added a couple of pieces of ribbon to the top, then my hearts and bow.
To finish off the inside I added a strip of the pennant paper to the top of the card and a heart in the corner. All of the edges are inked.
Thanks for stopping by and don't forget to share your cards with us.
Cutting Instructions:
Card Base: 8 1/2" x 5 1/2", scored at 4 1/4"
Red Background paper: 5 1/4" x 4"
Flower Paper: 4" x 2 1/2"
Border Punch: 4" x 1", then punch
Pennant: 2 1/2" x 4"
Recipe:
Paper: DCWV - Summer Dreams Stack, red and white cardstock
Ink: Inkadinkadoo - burgundy
Punches: Martha Stewart - Studded Heart (for the hearts) and Dancing Heart Border; Fiskars - 1/8" Circle punch
Misc.: White Ribbon, adhesive, pop up dots, scissors
I then added a punched border between the two layers to dress it up a bit. I used a Martha Stewart punch and punched three of the hearts out. I hand cut the pennant and added a couple of pieces of ribbon to the top, then my hearts and bow.
To finish off the inside I added a strip of the pennant paper to the top of the card and a heart in the corner. All of the edges are inked.
Thanks for stopping by and don't forget to share your cards with us.
Cutting Instructions:
Card Base: 8 1/2" x 5 1/2", scored at 4 1/4"
Red Background paper: 5 1/4" x 4"
Flower Paper: 4" x 2 1/2"
Border Punch: 4" x 1", then punch
Pennant: 2 1/2" x 4"
Recipe:
Paper: DCWV - Summer Dreams Stack, red and white cardstock
Ink: Inkadinkadoo - burgundy
Punches: Martha Stewart - Studded Heart (for the hearts) and Dancing Heart Border; Fiskars - 1/8" Circle punch
Misc.: White Ribbon, adhesive, pop up dots, scissors
Saturday, December 14, 2013
Snow - Season's Greetings
Hi everyone, today is my day to host at the Card A Day Blog. We are finishing up the Snow Theme before the Christmas Break and then we see you back in January for another fun year of Card Challenges. I do have cutting instructions at the bottom of this post.
I used the Plantin SchoolBook Cricut Cartridge to cut the tree border. One of the borders cut at 2" will make two cards. I then inked the edges with stickles. While this was drying I stamped my sentiment and matted it onto blue cardstock.
To make my card I started with a pieces of white cardstock cut at 8 1/2" x 5 1/2", scored at 4 1/2" on the 8 1/2" side. The front of the card is cut at 3" from the bottom of the card and then across to the top of the card. The die cut piece is attached to the back of the card front making the top of the card open.
I matted the inside with the blue cardstock to represent the sky. I added a few pearls to the blue cardstock to represent the stars. Thanks for joining us for the Card A Day Blog this year and we hope that you come back next year. Tomorrow Shelley will be here to inspire you.
Thanks for stopping by.
Cutting Instructions:
Card Base: White cardstock 8 1/2" x 5 1/2", scored at 4 1/4. Then top part of the front cut away. Mine is cut at 3" from the bottom of the card.
Blue Cardstock: (Inside blue mat) 4 1/8" x 5 3/8"
White Mat (Inside) 4" x 3"
White Cardstock (Sentiment) 3 1/2" x 2"
Blue Cardstock (mat for sentiment) 3 1/2" x 2 1/4"
Cricut: Plantin SchoolBook - Button 38, Italic Feature cut at 2"
Recipe:
Paper: Recollections - Blue and white cardstock
Ink: Colorbox - Royal Blue; Inkadinkadoo - Navy Blue
Stickles: Crystal Ice
Cricut Cartridge: Plantin SchoolBook
Mics.: Adhesive, pearls
I used the Plantin SchoolBook Cricut Cartridge to cut the tree border. One of the borders cut at 2" will make two cards. I then inked the edges with stickles. While this was drying I stamped my sentiment and matted it onto blue cardstock.
To make my card I started with a pieces of white cardstock cut at 8 1/2" x 5 1/2", scored at 4 1/2" on the 8 1/2" side. The front of the card is cut at 3" from the bottom of the card and then across to the top of the card. The die cut piece is attached to the back of the card front making the top of the card open.
I matted the inside with the blue cardstock to represent the sky. I added a few pearls to the blue cardstock to represent the stars. Thanks for joining us for the Card A Day Blog this year and we hope that you come back next year. Tomorrow Shelley will be here to inspire you.
Thanks for stopping by.
Cutting Instructions:
Card Base: White cardstock 8 1/2" x 5 1/2", scored at 4 1/4. Then top part of the front cut away. Mine is cut at 3" from the bottom of the card.
Blue Cardstock: (Inside blue mat) 4 1/8" x 5 3/8"
White Mat (Inside) 4" x 3"
White Cardstock (Sentiment) 3 1/2" x 2"
Blue Cardstock (mat for sentiment) 3 1/2" x 2 1/4"
Cricut: Plantin SchoolBook - Button 38, Italic Feature cut at 2"
Recipe:
Paper: Recollections - Blue and white cardstock
Ink: Colorbox - Royal Blue; Inkadinkadoo - Navy Blue
Stickles: Crystal Ice
Cricut Cartridge: Plantin SchoolBook
Mics.: Adhesive, pearls
Labels:
Card,
Card A Day Blog,
Plantin Schoolbook,
Snow Card
Saturday, November 30, 2013
Thanks so much
The theme is Christmas Thank You at the Card A Day Blog. For my card I started with the stamped image of the jar with holly from Unity's Kit of the Month. I used clear embossing powder then colored it in with markers and cut it out. I attached it to the front of my card with foam tape. I stamped and punched the 'Thanks so much' sentiment and added a felt bird.
I lined the inside of the card with the same paper and then cut a white mat and inked the edges. I also added a bit of the snowflake paper to the top of the mat.
Thanks so much for stopping by. Stop back tomorrow as we have a new challenge starting.
Recipe:
Stamps: Unity Kit of the Month October 2013 {Oh Christmas Tree}; Stampin' Up - Tiny Tags
Paper: DCWV Holiday Collection - The Christmas Stack, Kraft and white
Ink: Stazon - Jet Black; Color Box - Scarlet
Punch: Stampin' Up - Jewelry Tag
Misc.: Foam tape, adhesive, felt scissors, and various markers
Thanks so much for stopping by. Stop back tomorrow as we have a new challenge starting.
Recipe:
Stamps: Unity Kit of the Month October 2013 {Oh Christmas Tree}; Stampin' Up - Tiny Tags
Paper: DCWV Holiday Collection - The Christmas Stack, Kraft and white
Ink: Stazon - Jet Black; Color Box - Scarlet
Punch: Stampin' Up - Jewelry Tag
Misc.: Foam tape, adhesive, felt scissors, and various markers
Labels:
Card A Day Blog,
Christmas Thank You,
Tiny Tags,
Unity Stamps
Friday, November 22, 2013
Happy Hanukkah
Hi everyone, thanks for joining me from the Card A Day Blog. This week we are making Hanukkah cards. I'm using my Cricut and Design Studio to make my card. I used the image from the Joys of the Season cartridge for my focal image then layered it onto blue cardstock. I do have the cutting measurements listed below.
For the inside I just inked the edges of my mat. Tomorrow Shelley Bordeleau is our Designer at Card A Day so be sure to stop back and she what she has to inspire you. (Sorry for the dark first picture - it's really overcast here and just won't lighten up.)
Thanks for stopping by.
1 card for OWH
Cutting instructions:
Card Base: 8 1/2" x 5 1/2", scored at 4 1/4"
Blue and white pattern paper: 4" x 5 1/4"
Blue cardstock panel: 2 1/4" x 4 3/4"
Blue Polka Dot pattern paper: 2" x 4 1/2"
Glitter Paper: 3" x 3"
White layer: 2 3/4" x 2 3/4 with the circuit cut centered
Recipe:
Cardstock: Recollections - blue and white; DCWV - The Holiday collections "The Christmas Stack"
Best Creations - Glitter Cardstock -Lt gold leaf
Ink: Inkadinkadoo - Navy Blue
Cricut Cartridges: - Joys of the Season and George
Misc.: Adhesive
I like using a paper pack for this type of card as I know the colors will match. I layered the image onto a piece of glitter paper.
For the inside I just inked the edges of my mat. Tomorrow Shelley Bordeleau is our Designer at Card A Day so be sure to stop back and she what she has to inspire you. (Sorry for the dark first picture - it's really overcast here and just won't lighten up.)
Thanks for stopping by.
1 card for OWH
Cutting instructions:
Card Base: 8 1/2" x 5 1/2", scored at 4 1/4"
Blue and white pattern paper: 4" x 5 1/4"
Blue cardstock panel: 2 1/4" x 4 3/4"
Blue Polka Dot pattern paper: 2" x 4 1/2"
Glitter Paper: 3" x 3"
White layer: 2 3/4" x 2 3/4 with the circuit cut centered
Recipe:
Cardstock: Recollections - blue and white; DCWV - The Holiday collections "The Christmas Stack"
Best Creations - Glitter Cardstock -Lt gold leaf
Ink: Inkadinkadoo - Navy Blue
Cricut Cartridges: - Joys of the Season and George
Misc.: Adhesive
Labels:
Card A Day Blog,
Happy Hanukkah,
Operation Write Home,
OWH
Tuesday, November 12, 2013
Christmas Ornaments
Today I'm the designer at Card A Day Blog and we are making cards with a theme of Christmas Ornaments.
I started by stamping two of the ornaments, punching them out, then using the embroidery floss to create a hanger. I used the embossing folder a piece of white cardstock, added that to my card layer then added the ribbon. The ribbon I'm using is more like trim for sewing so it has some depth to it. I used pop up dots behind the ornaments and lined up the embroidery floss at the top of the card. After everything was placed I attached this layer to the card front.
To finish off the inside mat I added a strip of the pattern paper to the top of the mat. I'm leaving plenty of room to write my message as this one is going into the mail and has a way to go before it gets to it's home.
Thanks for stopping by.
Recipe:
Cardstock: Recollections, - white and blue; DCWV - Holiday Collection - The Christmas Stack
Ribbon: Unknown
Stamps: Stampin' Up - Tags til Christmas
Ink: Stampin' Up - Brocade Blue and Ballet Blue
Punch: Stampin' Up - Ornament Punch
Embossing Folder: - Cuttlebug - Snow Dots
Misc.: Adhesive, score tape, foam dots, embroidery thread
I started by stamping two of the ornaments, punching them out, then using the embroidery floss to create a hanger. I used the embossing folder a piece of white cardstock, added that to my card layer then added the ribbon. The ribbon I'm using is more like trim for sewing so it has some depth to it. I used pop up dots behind the ornaments and lined up the embroidery floss at the top of the card. After everything was placed I attached this layer to the card front.
Thanks for stopping by.
Recipe:
Cardstock: Recollections, - white and blue; DCWV - Holiday Collection - The Christmas Stack
Ribbon: Unknown
Stamps: Stampin' Up - Tags til Christmas
Ink: Stampin' Up - Brocade Blue and Ballet Blue
Punch: Stampin' Up - Ornament Punch
Embossing Folder: - Cuttlebug - Snow Dots
Misc.: Adhesive, score tape, foam dots, embroidery thread
Wednesday, November 6, 2013
Winter Hat Gift Card Holder
Hi everyone, thanks for hopping from A Card A Day Blog. The theme this week is gift card holders and my is a winter hat. Just in time as we are suppose to be getting out first snow. These are really quick and easy to put together.
Thanks for stopping by and don't forget that Lucy Kelleher will be back to inspire you.
Recipe:
Cardstock: DCWV - white, Holiday Collection The Christmas Stack.
Ink: Color Box -Baby Blue
Misc.: Crop- a-dile, adhesive, eyelet or brad, pom pom
For the hat part cut a 5" circle. I cut one out of white cardstock and one out of pattern paper (my pattern paper is flimsy that is why I use the cardstock). Cut each circle in half.
For the bank cut a piece of cardstock 5 1/8" x 2 and a piece of designer paper 5 1/8" x 1 7/8". Glue these two together and fold in half. The bank will support the gift card on the bottom.
Line all three pieces up on the left hand side and punch a through the band (front of card only) both of the half circles. You can use wither an eyelet or a brad to hold everything together. For my holder I used a cute snowflake eyelet. With the front of the hat up add a strip of adhesive to the back of hat and attach to the back of the band.
Since my hat is in boy colors I just added a blue pom pom to the to top. You can add anything - flowers, buttons, feathers. This is a really easy pattern to use anytime of the year.
This is what it would look like open with the a gift card inside. (I add a small bit of adhesive on the inside when I place my gift card to hold it inside.)
Thanks for stopping by and don't forget that Lucy Kelleher will be back to inspire you.
Recipe:
Cardstock: DCWV - white, Holiday Collection The Christmas Stack.
Ink: Color Box -Baby Blue
Misc.: Crop- a-dile, adhesive, eyelet or brad, pom pom
Saturday, October 26, 2013
American Thanksgiving
Hi everyone, thanks for joining me from the Card A Day Blog. I'm finishing off the week for American Thanksgiving cards.
I've started this card by cutting out a door frame with my Cricut. I then measured the white cardstock to fit behind the door and stamped the tree image. I added blue to the sky and green for the grass. I used a make up sponge for this part. Since my screen is another layer I wasn't too worried about dark places.
After attaching these two pieces together I layered them on top of my embossed brick paper with a piece of scroll work cut from the Cricut that I had left over from another project.
I stamped, hand cut the pumpkins and layered them by the door. All of this is layered onto another piece of tan paper, the brown cardstock and the card base. I did ink around the embossed brick layer.
Thanks for stopping by. Don't forget we start a new challenge Tomorrow.
Recipe:
Cardstock: Recollections - orange, brown, kraft and white; Provo Craft - The Slab III - tan paper;
Stamps: Unity Kit of the Month: August 2012 {Color of the Seasons} small pumpkins, August 2013 {cozy moments} large pumpkin, September 2012 {happiness has no limit} tree
Ink: Stazon - brown; Stampin' Up - Pumpkin Spice, Soft Suede; Distress Ink: Vintage photo, china blue, peeled paint
Embossing Folder: Tim Holtz - bricked
Misc.: Brad, mesh, adhesive
I've started this card by cutting out a door frame with my Cricut. I then measured the white cardstock to fit behind the door and stamped the tree image. I added blue to the sky and green for the grass. I used a make up sponge for this part. Since my screen is another layer I wasn't too worried about dark places.
After attaching these two pieces together I layered them on top of my embossed brick paper with a piece of scroll work cut from the Cricut that I had left over from another project.
I stamped, hand cut the pumpkins and layered them by the door. All of this is layered onto another piece of tan paper, the brown cardstock and the card base. I did ink around the embossed brick layer.
Thanks for stopping by. Don't forget we start a new challenge Tomorrow.
Recipe:
Cardstock: Recollections - orange, brown, kraft and white; Provo Craft - The Slab III - tan paper;
Stamps: Unity Kit of the Month: August 2012 {Color of the Seasons} small pumpkins, August 2013 {cozy moments} large pumpkin, September 2012 {happiness has no limit} tree
Ink: Stazon - brown; Stampin' Up - Pumpkin Spice, Soft Suede; Distress Ink: Vintage photo, china blue, peeled paint
Embossing Folder: Tim Holtz - bricked
Misc.: Brad, mesh, adhesive
Labels:
American Thanksgiving,
Card,
Card A Day Blog,
Thanksgiving
Thursday, October 10, 2013
Deer Christmas Card
Today I'm posting for the Card A Day Blog with the theme of Christmas Animals. I'm using a stamp and die set for my card.
I started by stamping the trees twice onto a light green pattern paper then die cutting them. I used my heat gun to dry the ink as the paper is a little slick. I stamped the deer onto tan cardstock and die cut him and an extra out of brown cardstock.
I cut off one set of the tree trunks and used pop up dots between the layers (you can see just a hint of the pop up dots between the layers). I layered everything onto the red ribbon and the tan cardstock. I off set the stamped deer with the dark brown cardstock for a bit of a shadow.
Thanks for stopping by.
Cutting instructions:
Card Base: 8 1/2" x 5 1/2", scored at 8 1/4"
Red layer: 4 1/8" x 5 3/8"
Green layer: 4" x 5 1/4"
Tan layer: 2" x 5 3/8"
Recipe:
Paper: DCWV cardstock - Red, white and Kraft, Luxury Stack (green for tree); Recollections - Brown; unknown tan and green solid
Stamp and Embossing Die: Tim Holtz - Holiday Joy
Ink: Stampin' Up - Old Olive
Zig Brushables - Root Beer Float
Ribbon: Offray 1 1/2"ribbon
Misc.: Pop Up dot, adhesive, heat gun
I started by stamping the trees twice onto a light green pattern paper then die cutting them. I used my heat gun to dry the ink as the paper is a little slick. I stamped the deer onto tan cardstock and die cut him and an extra out of brown cardstock.
I cut off one set of the tree trunks and used pop up dots between the layers (you can see just a hint of the pop up dots between the layers). I layered everything onto the red ribbon and the tan cardstock. I off set the stamped deer with the dark brown cardstock for a bit of a shadow.
Thanks for stopping by.
Cutting instructions:
Card Base: 8 1/2" x 5 1/2", scored at 8 1/4"
Red layer: 4 1/8" x 5 3/8"
Green layer: 4" x 5 1/4"
Tan layer: 2" x 5 3/8"
Recipe:
Paper: DCWV cardstock - Red, white and Kraft, Luxury Stack (green for tree); Recollections - Brown; unknown tan and green solid
Stamp and Embossing Die: Tim Holtz - Holiday Joy
Ink: Stampin' Up - Old Olive
Zig Brushables - Root Beer Float
Ribbon: Offray 1 1/2"ribbon
Misc.: Pop Up dot, adhesive, heat gun
Labels:
Card A Day Blog,
cards,
Christmas Animals,
Christmas Cards
Wednesday, September 25, 2013
Dark Night Bat Wings
Hi everyone and thanks for joining me from the Card A Day Blog. This week’s
theme is all about Halloween. I had this new stamp "Spooky dark night bat
wings" from Unity Stamps that I wanted to use as a label on my
jar, but I just couldn't get it to work. So I used it as a tag instead
and the bats inside my jar.
I was going to call it quits there but the jar looked like it need something to I added the neon ribbon around the top of it. That neon ribbon is so old; my guys used it to make stuff out of pony beads, so I have no idea who made it. I also added stickles to the eyes of the bats.
Thanks for stopping by.
Cutting Instructions:
Card Base: 8 1/2" x 5 1/2", scored at 4 1/4"
Word Paper: 4" x 5 1/4"
Polka Dot Paper: 4" x 1 1/4"
Inside Card: 4 1/2" x 4"
Recipe:
Cardstock: Recollections - Black and white; DCWV - white; My Minds Eye - Day Dream Bugglegum Girl; Stampin' Up - Frist Edition
Stamps: Clear Stamps - Halloween Boogie (small and medium bats); Unity Stamps - Unity Kit of the Month - August 2012 {Colors of the Seasons}, August 2013 {cozy moments}
Ink: Stampin' Up - Basic Black and Basic Gray
Punch: Martha Stewart - Spider Web border
Ribbon: Stampin' Up - Cherry Cobber and Pear Pizzazz;
Stickles: Fruit Punch
Misc.: Adhesive, pop up dots, scissors, button, scrap of jute
I started by stamping my jar onto white cardstock and
cutting it out. I then placed my bats inside my jar to get the placement,
took my acrylic block and pressed them onto it, then inked my stamps.
While they were drying I punched the spider web in black cardstock (for
the front of the card) and in the Frist Edition pattern paper (for
the inside). I added my polka dot band to the spider web border and
placed it on the card. I then put the jar on the paper and once
again placed the bats, pressed my acrylic block to them then inked
them. After I stamped all the bats I then started attaching
everything to the card front.
For the inside of my card I use white cardstock for the memo
section then added the First edition paper that I punched earlier to the
back. I also stamped another set of bats in the corner.
I was going to call it quits there but the jar looked like it need something to I added the neon ribbon around the top of it. That neon ribbon is so old; my guys used it to make stuff out of pony beads, so I have no idea who made it. I also added stickles to the eyes of the bats.
Thanks for stopping by.
Cutting Instructions:
Card Base: 8 1/2" x 5 1/2", scored at 4 1/4"
Word Paper: 4" x 5 1/4"
Polka Dot Paper: 4" x 1 1/4"
Inside Card: 4 1/2" x 4"
Recipe:
Cardstock: Recollections - Black and white; DCWV - white; My Minds Eye - Day Dream Bugglegum Girl; Stampin' Up - Frist Edition
Stamps: Clear Stamps - Halloween Boogie (small and medium bats); Unity Stamps - Unity Kit of the Month - August 2012 {Colors of the Seasons}, August 2013 {cozy moments}
Ink: Stampin' Up - Basic Black and Basic Gray
Punch: Martha Stewart - Spider Web border
Ribbon: Stampin' Up - Cherry Cobber and Pear Pizzazz;
Stickles: Fruit Punch
Misc.: Adhesive, pop up dots, scissors, button, scrap of jute
Subscribe to:
Posts (Atom)