Showing posts with label Plantin Schoolbook. Show all posts

Friday, January 26, 2018

Winter

In my January Counterfeit Kit - Holiday Joy I had a sheet of pink snowflake paper which I wasn't sure how I was going to use. After looking through some of that winter's pictures I decided to keep the background as it was and add the title "winter" between my pictures.


Using Platin SchoolBook as my font, set at 3 1/2", I welded "winter" and cut it out using Design Studio. I really like how it turned out. I had snapped these pictures as were finally in double digits for the temperature. We had been hovering around -7 and for a week and finally made it to 32.

 Thanks for stopping by.

Christy's Beautiful Life: #30DSCBL2

Sketch #1: Christmas Ornaments
Sketch #2: Oh Christmas Tree
Sketch #3 - Merry Christmas Tree
Sketch #4: Iron Monuments
Sketch #6: Snowflake Layout

 100 Pattern Paper Challenge: 3 sheets

January Counterfeit Kit - Holiday Joy
12 - 12x12 Layouts
 5 - 8 1/2x11 Layouts
 2 - 12x12 Project Life
     8 1/2x 11 Project Life
1 - Planner Pages
8 - Cards
8 - Tags

Recipe:

January Counterfeit Kit - Holiday Joy
Paper: Craft Smith white and dark red cardstock; Bo Bunny - Holiday Cheer; Provo Craft Slab III
Cricut Cartridge - Plantin SchoolBook

Saturday, December 14, 2013

Snow - Season's Greetings

Hi everyone, today is my day to host at the Card A Day Blog. We are finishing up the Snow Theme before the Christmas Break and then we see you back in January for another fun year of Card Challenges.  I do have cutting instructions at the bottom of this post.


I used the Plantin SchoolBook Cricut Cartridge to cut the tree border. One of the borders cut at 2" will make two cards.  I then inked the edges with stickles.  While this was drying I stamped my sentiment and matted it onto blue cardstock. 


To make my card I started with a pieces of white cardstock cut at 8 1/2" x 5 1/2", scored at 4 1/2" on the 8 1/2" side. The front of the card is cut at 3" from the bottom of the card and then across to the top of the card.  The die cut piece is attached to the back of the card front making the top of the card open.


I matted the inside with the blue cardstock to represent the sky. I added a few pearls to the blue cardstock to represent the stars.  Thanks for joining us for the Card A Day Blog this year and we hope that you come back next year.  Tomorrow Shelley will be here to inspire you.

Thanks for stopping by.

Cutting Instructions:
Card Base: White cardstock 8 1/2" x 5 1/2", scored at 4 1/4. Then top part of the front cut away. Mine is cut at 3" from the bottom of the card.
Blue Cardstock: (Inside blue mat) 4 1/8" x 5 3/8"
White Mat (Inside) 4" x 3"
White Cardstock (Sentiment) 3 1/2" x 2"
Blue Cardstock (mat for sentiment) 3 1/2" x 2 1/4"

Cricut: Plantin SchoolBook - Button 38, Italic Feature cut at 2"

Recipe:
Paper: Recollections - Blue and white cardstock
Ink: Colorbox - Royal Blue; Inkadinkadoo - Navy Blue
Stickles: Crystal Ice
Cricut Cartridge: Plantin SchoolBook
Mics.: Adhesive, pearls

Monday, February 18, 2013

Presidents Day Weekend VCMP - Saturday Challenges

Operation Write home is host a Virtual Card Making Party (VCMP) for President's Day.  Here are my card for the Saturday Challenge.

Challenge # 1: Zig Zag your Cards
Erica  is hosting the first challenge on her block Scrapin' Intervention and it  is to make cards using zig Zags.  I've used the Cricut Cartridge Plantin Schoolbook for the zig zag on my card and Wildcard for my sentiment.


I've cut an extra zig zag for the inside of my card.


1 card for OWH

Challenge #2: All Creatures Great and Small; Cards for Kids:
The second challenge is by Misty at DeLiteful Gifts and it is to make a Critter Card.  I've used a stamp set that my oldest son had given me a couple of years ago.  There are 6 different dogs in this set and I only made 4 different card using the  dogs. 

 Everything for the cards was pulled out of my scrap pile.


I used the 2 1/2" circle punch and layered a second one behind my images.


4 Cards fir OWH

Challenge #3: Texture Omit/Selective Embossing Challenge:
Beth at Bunnyscrap has a great embossing challenge.  I used the a Sizzlits die to make my diffuser for this challenge.  She has a great tutorial on her blog showing you how to do this.


I added another punched leaf and a bit of ribbon on the inside of the card.

1 card for OWH

Challenge #4: Things with Wings:
Candy's at Penguinpapers challenge is to use wings on your cards.  I used the Hoot 'n Holler cartridge for my owls for this challenge. 


2 cards for OWH

Challenge #5: Disappearing Act with Sketch #63:
Leslie at The Crooked Stamper is using 12x12 paper to make six card with sketch #63.  I've used Paper Lace II for my sentiment instead of stamping. 


6 Cards for OWH

Thanks for stopping by.
14 cards for OWH

Recipe:
Paper: Card stock: Recollection Card Bases; Unknown scraps for rest of projects
Stamps: Gel-a-tins: Pups; Stampin' Up: Whimsical Words;
Cricut Cartridges: Plantin Schoolbook and Wildcard, Hoot 'n Holler, and Paper Lace II
Embossing Folders: Cuttlebug - Textile
Die: Sizzix: Decorative Label Set #4 - Ornate Label #5

Saturday, November 12, 2011

Gingerbread Man

As you know from this weeks posts that today is my day to post for Card A Day Blog, the theme is Christmas Food and I'm continuing the Gingerbread Man theme.  I made an Easel card for today's card.   I used Design Studio to size up my pieces.  

My card size is 4 1/4 x 4 1/4 and I'm not planning on using this card in an envelope but attaching to the bag of Gingerbread cookies that I will be making and giving to someone special. 


The ric rac is from the Plantin Schoolbook cartridge.  I added a sheer ribbon behind my gingerbread man with the bow tied on the side.


Don't for get to stop by the Card A Day Blog to get your Daily Inspiration for Christmas Cards.

Thanks for stopping by and don't forget to visit the Card A Day Blog for your daily inspiration. Tomorrow starts the new weekly theme of Christmas Around the World with Designer Vicki Schram of Paper Squirrel

Click here for the cut file.
Click here to go to Splitcoast Stampers tutorial on how to make and Easel card (other sizes are in the tutorial).

Card front assembly:
Brown Cardstock  - 4 1/4 x 4 1/4
Blue Cardstock - 4x4
Cream Cardstock 3 3/4 x 3 3/4
Pattern Paper - 3 1/2 x 3 1/2

Inside Assembly:
Blue Cardstock - 4x4

Cream Cardstock 3 3/4 x 3
Red punched border - 3 3/4 x 3/4
Pattern Paper - 3 3/4 x 1 1/8


Recipe:
Paper: Cardstock: Recollections - brown, Unknown scraps - blue, red, white, cream; Pattern Paper - K&I memories scrapbook kit (it's a couple of years old)
Cricut Cartridges: From My Kitchen, George, Plantin Schoolbook
Ink: VersaMagic - Red Magic
Punch: Ornament punch border
Misc: Offray sheer ribbon, buttons, adhesive, pop up dots.

Wednesday, November 9, 2011

Gingerbread Man Place Card - Day 3

I pulled out my scraps to make this place card.  I used Design Studio to weld the shapes together to make the base.  The white rectangle is from the George and the Basic shapes and the Gingerbread man is From my Kitchen. 
Thanks so much for stopping by.

Click here for the cut file.


Recipe:
Paper: Cardstock - unknown scraps - white, red; Pattern Paper - K&I Memories - scrapbook kit (it's a couple of years old)
Cricut Cartridges: Accent Essentials, From my Kitchen, George and Basic Shapes, Plantin Schoolbook
Ink: Autumn Leaves - Brown
Misc: buttons, adhesive, foam tape

Tuesday, November 8, 2011

Gingerbread Recipe Page - Day 2

To continue the Christmas Food Theme I have an 8x8 Recipe page for Gingerbread Cookies for Day 2 

I used Design Studio on this layout to get the sizing right. I cut the gingerbread man out of brown cardstock and the face and zig zags out of white cardstock . I used a couple of red buttons on the front of him.  The gingerbread man snowflake is from When Its Cold Outside and I have the "cookies" on a clear button in the center of the snowflake. I have the sheer ribbon running behind the snowflake and a tab on the recipe instructions.

Thanks for stopping by.

Click here for the cut file.

From my Kitchen - Gingerbread Man - 3" and the shadow feature; Face - Layers features at 3"
Gingerbread Man Snowflake: When Its Cold Outside - 4"
Plantin Schoolbook - zig zag width 4.871 height .411

Recipe:
Paper: Cardstock: DCWV - Blue; Recollections - Brown and White; Pattern Paper - K&I Memories Scrapbook kit (it's a couple of years old)
Cricut Cartridges - George and Basic Shapes, From My Kitchen, When Its Cold Outside, Plantin Schoolbook
Ink: VersaMagic - Red Magic, Autumn Leaves - brown
Stamp: My Sentiments Exactly - Holiday Tags
Punch: Stampin' Up 1 3/8"
Misc: adhesive, pop up dots, buttons, Organdy Ribbon 7/8", buttons.

Wednesday, June 15, 2011

4x6 Mini Album - Part Three

These are the final pages in the 4x6 mini album from the Piggy Tales Kit.


I used some more of the barn doors and tags with the rub on for this page. I didn't use my cricut for the pocket.


I just love this little chipboard turtle. I have him up on pop up dots so that the picture can slide behind him and added a little bit of ribbon.


I used the same Wild Card envelope for this page that I used on page six, but only cut one of the liners. I did not adjust the envelope and used staples again.


Here is the last page of my album. The trim used here was included in the kit and a photo can fit behind the trim. I glued the trim to the back of the photo mat, then glued the mat to the background paper. The bow is made separate and I used a glue to attach it to the ribbon.


Here is the album all put together. Thanks for stopping by. Click here for the cut file.


Click here for Part One


Disclosure: I'm not affiliated with any of the products mentioned.


Recipe: (Most of the paper is from the Piggly Tales Kit along with the chipboard, pieces, barn doors, rub ons and chipboard pieces).


Paper: Piggy Tales Kit - 5 Little Ducks, Cardstock - DCWV and Stampin' Up


Cricut Cartridges: Fabulous Finds, George, Heritage, Plantin SchoolBook, Tags Bags Boxes and More, and Wild Card


Ink: Inkadinkadoo - Terra Cotta, Navy Blue, and Olive Green


Misc: Adhesive, ribbon and yarn scraps, binder clip form the office supply store, Bind it all and stapler

Wednesday, June 8, 2011

4x6 Mini Album - Part Two

Here are pages 5, 6, 7, and 8 of the 4x6 Mini Album from the Piggy Tales Kit.

The kit had a bunch of the Barn Doors in it, I just backed them with white paper so that they could be used as a journaling spot. The "Boys" is from the stickers that were included with the kit.


Page six has a envelope from the Wild Card Cartridge. I cut two liners for the this page, one to use as and actual liner and the other in white cardstock for journaling. I had to use staples on the sides as I cut my envelope a little to big and didn't want the adhesive to stick to the envelope. The shipboard star was included with the kit.


Page seven is just a pocket with a couple of tags made with scrap paper and stickers. The yarn is left over from a crochet project that was made for my niece.


Page eight is another simple page as I have a little bit of bulk on pages six and seven.


Click here for Part One


Disclosure: I'm not affiliated with any of the products mentioned.


Recipe: (Most of the Paper is from the Piggy Tales Kit along with the chipboard pieces, barn doors rub ons and stickers).
Paper Piggy Tales Kit - 5 Little Ducks, Cardstock - DCWV and Stampin' Up
Cricut Cartridges: Fabulous Finds, George, Heritage, Plantin SchoolBook, Tags Bags Boxes and More, Wild Card
Ink: Inkadinkadoo - Terra Cotta, Navy Blue, Olive Green


Misc: Adhesive, ribbon and yarn scraps, binder clip from office supply store, Bind it All, stapler

Wednesday, June 1, 2011

4x6 Mini Ablum - Part One

I've been working on a mini album using some of the scraps from the Piggy Tales Kit. I used my Cricut heavily on this project along with some of the rub ons that were included in the kit. I'm going to use my Bind It All to put it all together but you can use rings or any binding method you like.


I cut the frame 5 times from cardstock and glued them together. My ribbon is wrapped around the cover and page two. I didn't care it it showed through at the edges. I glued the edges of the frame so that the mat can be removed and a photo put on it or journaling. My cut file has a circle for the crumpled flowers that I did not use. The is some that is left over from anther project and was a wire ribbon - I just pulled the wires out.


Page Two is really simple. I tried to alter my pages with a simple photo mat page and a page with embellishments.


Page three has a lot going on. I used the notebook paper from the Fabulous Finds cartridge and cut it out three times to make a removable notebook with a tag pocket on the front of it. I just used a binder clip to attach it to the page.


Here is page three taken apart. The button is a chipboard piece that was included in the kit. I used scrap ribbon and staples to bind the edge of the notebook.


Page 4 is another simple page. The "toadly awesome" is a rub on that was included in the kit.

I'm planning on binding my album at the top so the even numbered pages (or back of the page) have the holes punched for the binding at the bottom of them Thanks for stopping by.


Disclosure: I'm not affiliated with any of the products mentioned.


Recipe: (Most of the Paper is from the Piggy Tales Kit along with the chipboard pieces, barn doors and rub ons.

Paper: Piggy Tales Kit - 5 Little Duckies, Cardstock - DCWV and Stampin' Up.
Cricut Cartridges:Fabulous Finds, George, Heritage, Plantin SchoolBook, Tags Bags Boxes and More, Wild Card

Ink: Inkadinkadoo - Terra Cotta, Navy Blue, Olive Green
Misc: Adhesive, ribbon and yarn scraps, binder clip from office supply store, Bind it All and rings, stapler

Tuesday, May 17, 2011

I heart this face and Smile . . .

For my fourth set of double page layouts I used the paper crimper to add a bit of texture to the faux ribbon strips. I will have to use this technique more often.

I added a large button to the center of the heart and layered the heart onto a chipboard piece. This page was another one that had the instructions for a 12x12 page.


I crimped the border pieced and punched the top and bottom of it border. Smile if from the stickers in the kit.

As usual I created a Design Studio file for the layout, but I have not cut it yet. Click here for the file. Thanks for stopping by.


Disclosure: I'm not affiliated with any of the products mentioned.


Recipe:

(Piggy Tales Kit included the chipboard letters and accents, alphabet rub on).

Paper: Piggy Tales Kit, DCWV cardstock

Ink: Inkadinkadoo - Coffee Bean

Cricut Cartridges: Accent Essentials, All Mixed Up, George, Fabulous Finds, Plantin SchoolBook

Misc: pop up dots, adhesive, button,

Friday, May 13, 2011

I lov you . . .

Here is the third set of double page layouts from the Piggy Tales Kit.


I love the polka dot chipboard letters that were included in the kit. This page was one of the ones that came as part of the project list. I just changed it from a 12x12 page to a 11x8.5 page.


I used the same punch on the cardstock to help tie both pages together. The striped paper is from cutting the 12x12 paper down to 8.5x11 and was a perfect accent for page two.

As usual I created a Design Studio File for this layout, I have not cut the file yet so let me know if there are issues. Click here for the file. Thanks for stopping by.


Disclosure: I'm not affiliated with any of the products mentioned.

Recipe:
(Piggy Tales Kit included the chipboard letters and various chipboard tags)
Paper: Piggy Tales Kit, DCWV cardstock
Ink: Inkadinkadoo - Coffee Bean
Punch: Martha Stewart - Swirling Lace
Cricut Cartridges: Accent Essentials, All Mixed Up, George, Fabulous Finds,Plantin SchoolBook
Misc: Twine, adhesive and pop up dots.

Tuesday, April 26, 2011

Hug at your own risk . . .

Awhile back I ordered a Piggy Tales Kit, it was a sampler which came with a project list, instructions and color photos of the completed projects, and I only had to pay for shipping. Well the kit came and it was their January Kit and perfect for little boys so I made a few pages for my sister for her grandson.


I added a few pieces of DCWV cardstock, that way I didn't have to use the backside of the pattern paper. The ribbon and brad that are in the flower were not included in the kit.


I added the rubons from the kit to either side of the photo mat.


As usual I created a Cricut file for the layout, click here for the cut file. Thanks for stopping by.

Recipe:
Paper: Piggy Tales Kit, DCWV cardstock
Ink: Inkadinkadoo - Coffee Bean
Punch: Martha Stewart - Swirling Lace; Stampin' Up - Designer Label
Cricut Cartridges: George, Fabulous Finds, Plantin SchoolBook, Wild Card


Misc: Brad, ribbon, adhesive

Friday, February 25, 2011

Notes and Details Layout

When I saw the Notes & Details stamp in the Stampin' Up catalog I just had to add it my collection. They showcased it using a layout page and I did page one similar to the one in the catalog. I just love the accents, the stamping along the side and the embossed strips on both sides of the photo mat.


I added a couple of tags to my ribbon on the right hand side. The hearts and date stamp are on small buttons so that the pictures can slide behind them. For the embossing on either side I used a 3" piece of cardstock embossed it, then cut it in half and lined it up on either side of the photo mat. I did emboss with clear embossing powder the bracket on this page only.


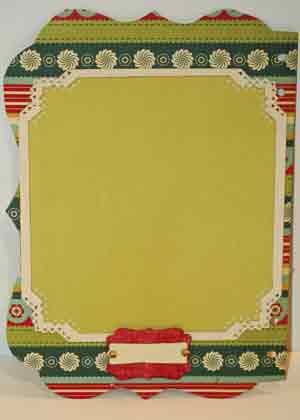
I incorporated the same colors and accents but added an edging and a label punch to the
4x6 pages and the 2x8 strip.


I just alternated the placements of the tags and hearts on the back side of the pages.


The last pages is another 8x8 page. For the reverse of the bracket, I stamped on the back side of the paper then cut it out. I also added three of the Decorative punches instead of stamping the numbers again.


As usual I designed the whole layout on Design Studio before I actually made it so I do have a cut file for it here.


This is how much paper I used for this layout: 1 - 12x12 green cardstock, 2 8.5x11 tan cardstock, 1- 8.5x11 off white cardstock and scraps of pink and blue. Thanks for stopping by.

Recipe:
Paper: DCWV cardstock - tan, green, off white; Pattern paper - blue and pink scraps unknown maker.
Stamps: Stampin' Up - Notes & Details
Punch: Stampin' Up - Word Window, Large Tag, Eyelet Border, Decorative Label; Paper Shapers - Folk Heart; hole punch
Ink: Stampin' Up - Soft Suede; Clear Embossing Pad
Cricut Cartridges: Accent Essentials, George, Plantin SchoolBook
Misc: ribbon, yarn, adhesive, buttons, Clear Embossing Powder.

Wednesday, February 2, 2011

Mini Album Wednesday - Family Part Two

Today is Part Two of the Family Mini Album and I'm showing pages two, three and four.

I had already cut out this tree border for another project and didn't use it, but it works wonderfully on this page. I just trimmed it down to the size I wanted and used foam tape behind it so that the picture can slide behind the tree. I rounded the edges of the photo mat and inked a modern label punch and added a couple of rhinestones to finish off the page.
For page three the photo mats are from the Sunburn stack and I used Stampin' Up Pinking Hearts corner punch to spice them up a bit. I used the Stampin' Up Extra Large Decorative Label and the Modern label with a couple of rhinestones to finish off the page.


Now page four was a little bit harder. With the red cardstock I made a pocket page so that I can slide another photo mat into the pocket. I then used the Martha Stewart Birds on a wire punch to accent the edge of the pocket. On the blue and white photo mats I used the ticket corner punch. The bird accent on the photo mat is the Stampin' Up Two Step Bird punch. I like that you can place the wing where you want on the bird. Then I used the large tag punch and matted it onto green paper.

For the Pocket photo mat I made it the same as the photo mat on the front just a little bit smaller. The blue and white cardstock is punched with the ticket corner punch and added the bird accent. Both the front and back of the Pocket Photo mat is decorated the same.

If you a question about a certain page just leave a comment and I'll get back to you. Thanks for stopping by.

If you missed Mini Album Wednesday - Family Part One click here.

If you would like the tree border cut file click here, using Plantin SchoolBook and George cartridges.

Recipe: (This is a general listing of the supplies I used)
Paper: Front and Back album paper - My Minds Eye 29th Street Market Fresh Outdoors - Spring Greens/Sprout: Scrapbook Heaven Kit for the background papers on the pages; DCWV for the cardstock; Sunburn for the accents; Recycled Chipboard for the the individual pages
Punches: Martha Stewart - Birds on a wire, Garden Trellis, Arch Lattice, Daisy Fan
Stampin' Up Punches - Modern Label, Extra Large Decorative Punch, Large Tag, Word Window, Extra Large Scallop Oval, Two Step Bird Punch, Ticket Corner Punch, Scallop Trim, Pinking Hearts; EK Success: Wrought Iron Corner Punch
Cricut Cartridges: Plantin SchoolBook and George
Misc: Making Memories Mini brads, Recollection Boutique Fleur - Mulberry paper butterfly, Ribbon, White and Gold berries, K&Company Echo Modern Metal Art Label Holders, Recollections rhinestone stickers, Rhinestones in various colors, pop up dots and foam tape, various rubons.

Tuesday, October 12, 2010

Fabulous Fall

Here's another layout I did for the Girls' Christmas Box - Please not that is the 12x12. I used the Pages in Time Thrusday Sketch.

I cut "fabulous" out twice - once in brown and then in red. The red layer is pop dotted. The title "Fabulous FALL" looks better in person.
I used the Arch Lattice Punch to make the Medallion on my hidden journaling tag. The photo mat is cut at 4.25x6.25 and pop dotted on the edges to hide the journaling tag.

I inked everything on the border and pop dotted the leaves and berries. The acorns are glued to the border.


Thanks for stopping by.

Click here for the cut file.
Recipe:


Paper: Seasons Paper Pad - Stripe Paper,; DCWV cardstock - dark blue, light blue, red, green brown, yellow, tan, orange, Unknown Source - Orange Photo Mat and Kraft Cardstock.
Ink: Brown
Punch: Martha Stewart - Arch Lattice
Cricut Cartridges: Dooglecharms, George, Jasmine, Mini Monograms, Plantin SchoolBook, Tags Bags Boxes & More
Misc: Glue, Pop Dots